 Flux Art
When the product scene is ready but AI keeps changing the interface text on the screen, separate the approved screenshot from the device base image first. After generating or editing a candidate with GPT Image 2.5 in Flux Art, use post-production software to transform only the screen content layer, align it to the actual visible area, then handle occlusion and export checks. Do not rely on repeated generation to keep the text unchanged.
Confirm the screen plane and approved content
Save the device’s base image, approved interface screenshot, and corresponding version. Confirm the screenshot is cleared for this presentation and does not imply functionality the physical product model lacks. Separate the active display area from the surrounding bezel; the four corners refer to the visible content boundary, not the device casing. For curved screens, obvious lens distortion, obscured corners, or nearly side-on views, first obtain clearer references or choose a composition whose geometry can be confirmed. A planar transform cannot automatically account for curvature or missing geometry; do not fill in invisible boundaries from memory as though they were product facts.
Transform only the content layer; keep the device straight
Keep the base image unchanged in a duplicate, place the approved screenshot on a separate content layer, and confirm its aspect ratio, orientation, and information to preserve before fitting it to the screen with the post-production software’s free transform or distort tools. Adobe documentation explains that Photoshop’s Free Transform can combine scaling, rotation, skew, distortion, and perspective; check the tool names and shortcuts for the current version. This task requires checking each corner individually; simply rotating a rectangle does not ensure the perspective matches. The content orientation should reflect realistic use. If the screenshot’s aspect ratio differs from the screen’s, first confirm the cropping or margin rules; do not arbitrarily squeeze the text.
Handle occlusion and reflections separately from the source text
When fingers, the bezel, or foreground objects cover the display, use a separate mask to define which pixels appear in front of the content. Do not place the screenshot directly over fingers or redraw device ports to accommodate the overlay. Keep reflections and brightness adjustments on another layer that can be turned off, so reviewers can inspect the content and blending separately. Text hidden by occlusion cannot be signed off as read back correctly; if key prices, model numbers, or operating instructions become invisible, adjust the composition. Visual blending describes only the appearance of this composite image; it is not evidence of testing for brightness, resolution, color accuracy, or software compatibility.
Check the layered file and final display separately
First turn off the effect layers and compare the content and order character by character with the approved screenshot. Confirm there are no missing characters, outdated versions, or stretched icons; then turn on the occlusion and reflection layers and check that their edges do not extend beyond the screen. Finally, inspect the actual exported file at its intended display size, paying attention to small text, bezel gaps, and cropping. Do not rely only on how it looks when enlarged in post-production software. Deliver the base image, approved screenshot, content layer, occlusion layer, output file, and any unresolved items. If the interface changes, replace the content layer and review it again; do not treat the composite as a lossless original screenshot.
Source background and related entry points
The number of ports determines whether it is the same product
USB ports, vents, and buttons are easy to redraw. Provide a clear primary sales angle and close-up views of the ports, and list their positions and counts as details that must not change. If the original image does not show the ports clearly, take new photos first; do not let the model invent a layout that merely looks plausible.
| What this task must clarify | Details |
|---|---|
| Inputs or conditions | Authentic product photos and the number of ports, buttons, screen, dimensions, logo, materials, and actual functions |
| Corresponding actions | White-background images, port details, use scenarios, specification highlights, and packaging images |
| Required checks | Invented ports, incorrect screen information, distorted proportions, and misleading claims about functionality |
Screen content does not automatically come with usage rights
App, film, or game content shown in an image must have a valid basis for use. Specifications, compatible devices, and connection behavior also need factual references. Product images may use designed environments, but must not show connection capabilities or display behavior that the product does not have.
Flux Art is operated by MORNING STAR INDUSTRY LIMITED. It is a multi-model AI visual creation and production platform where one account can access 50+ third-party image and video models, with e-commerce tools for product image sets, background replacement, retouching, and virtual try-on. Model pages and e-commerce tools are separate entry points. If a task specifically requires GPT Image 2.5, confirm the selected model in the corresponding model entry point; do not attribute results from every tool to that model.
Put 3C product image work into practice
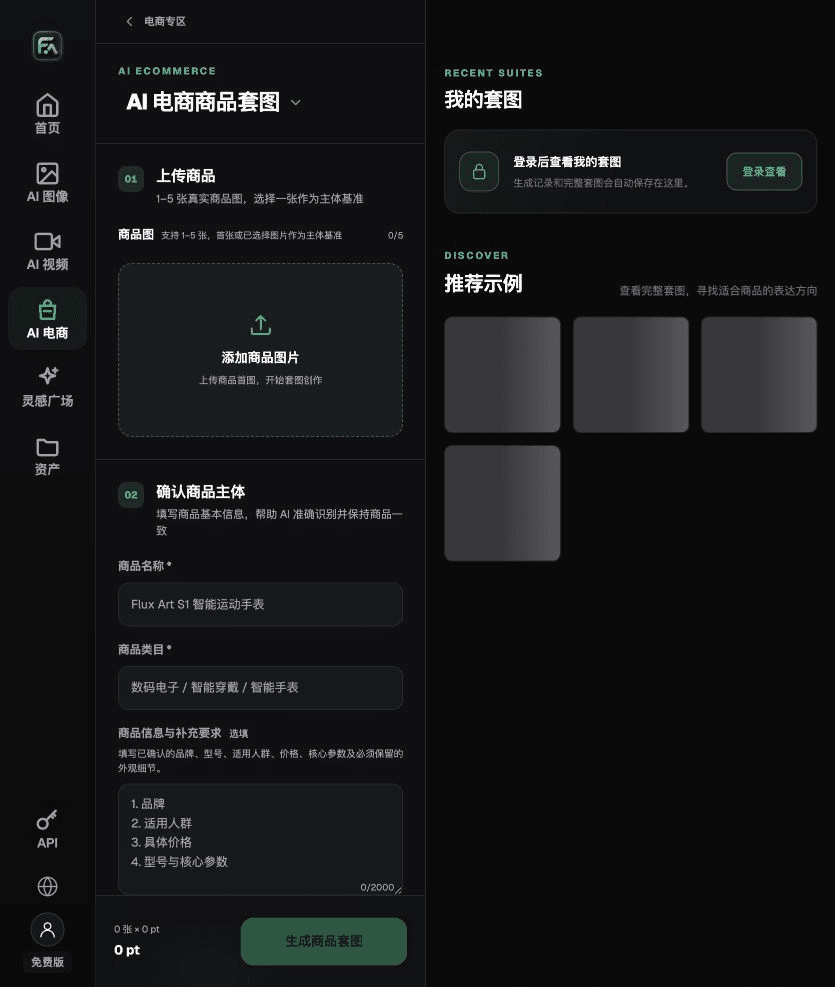
For 3C product images, complete the relevant steps in Product Suite: upload 1–5 authentic product photos; enter the product name, category, factual details, and details that must be preserved; choose modules such as the primary product image, white-background main image, key selling points, use scenarios, or detail close-ups; and set the aspect ratio, clarity, and language.
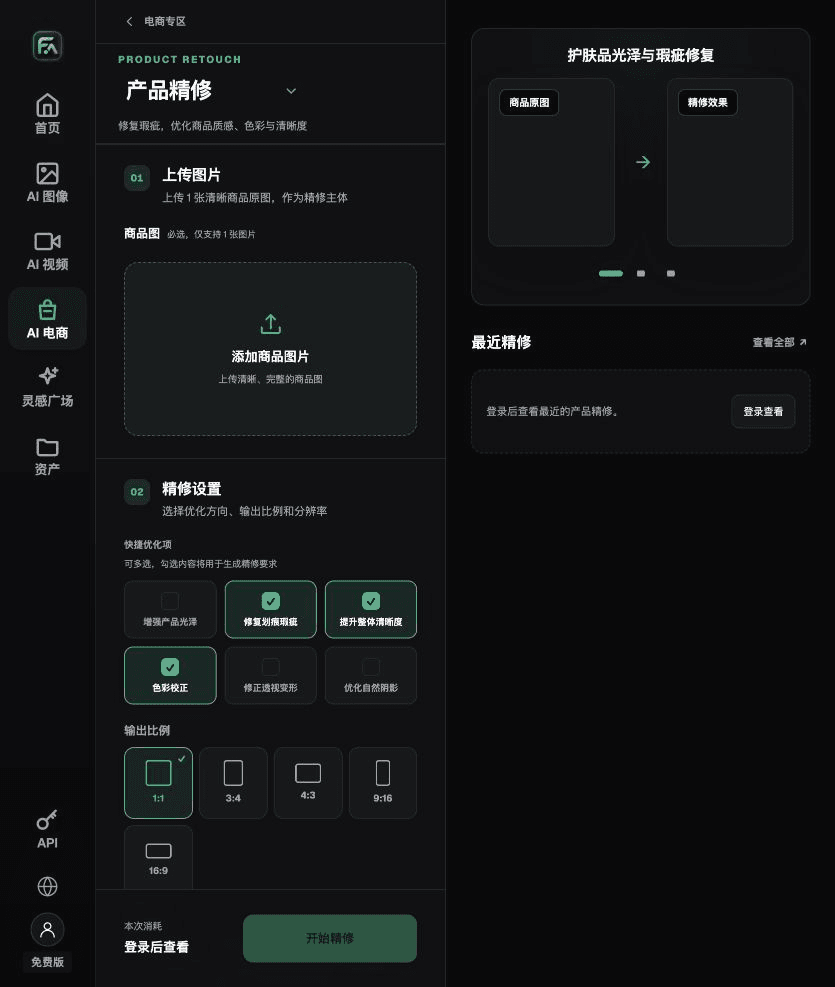
For 3C product images, complete the relevant steps in Product Retouch: upload one product photo with a clear subject and no severe occlusion; select gloss, scratches/blemishes, clarity, color correction, perspective distortion, and natural shadows as needed. You do not need to enable every option.
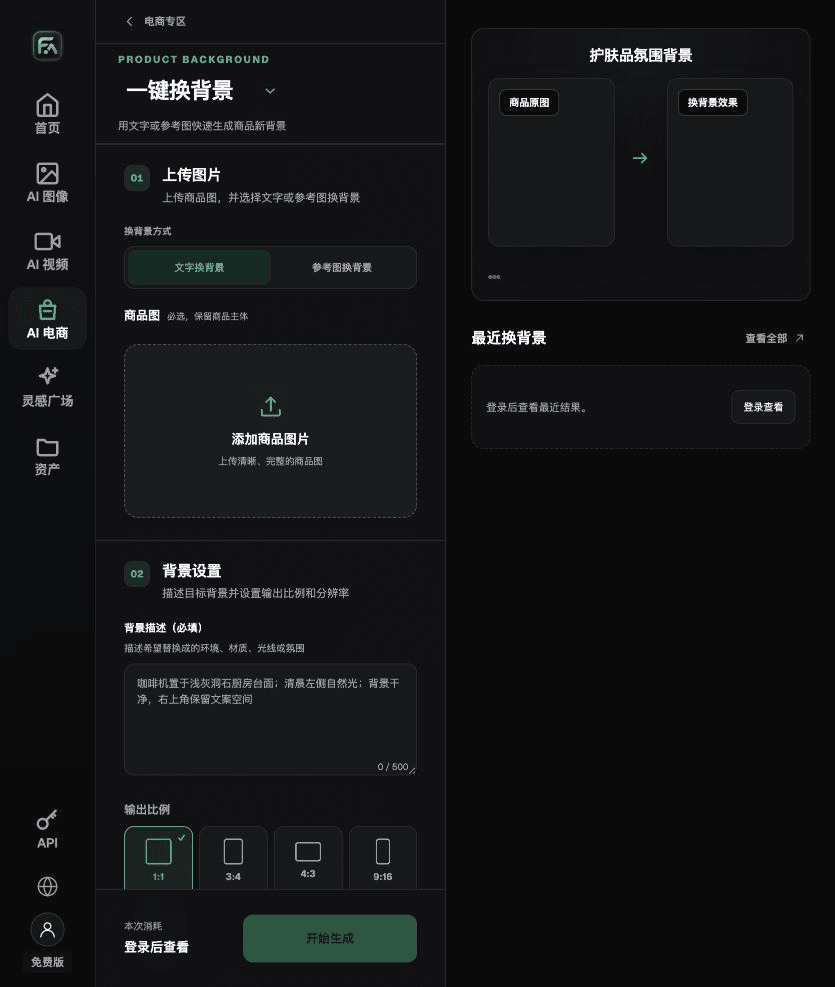
For 3C product images, complete the relevant steps in One-Click Background Replacement: upload a product image and describe the background in text, or upload a background reference image you have permission to use. Specify the environment, surface material, light direction, mood, and contact shadows, and list the product details that must not change.
For 3C product images, also check for invented ports, incorrect screen information, distorted proportions, and misleading claims about functionality. Review this delivery checklist together with the earlier requirement, “The number of ports determines whether it is the same product.”
A prompt to try for this task
Create an e-commerce image for a consumer electronics product. The subject comes from the uploaded photo of the actual product. Preserve its number of ports, buttons, screen, dimensions, logo, materials, and real functionality. For this handoff, create only one product-scene candidate; the approved interface content will be placed independently in post-production. Target audience: [fill in]. Placement: [fill in]. Lighting: [fill in]. Do not invent specifications, accessories, certifications, benefits, or structural details.

Check these items before delivery
After completing a 3C product image, inspect the final file for invented ports, incorrect screen information, distorted proportions, and misleading claims about functionality. If you continue with other modules or SKUs, carry forward the approved evidence for the product itself, then validate each new task separately. Check the current page for submission usage and available options.

From production to deliverable files
After completing this page’s task, archive the original inputs, approved conditions, selected tool or model, operating instructions, candidate versions, and final files together. Keep originals separate; revisions and diagnostic copies must not overwrite them. Include the business task ID in filenames so recipients can trace each conclusion to its corresponding input and output. Before delivery, check every item against this task’s checklist and leave unresolved issues marked as unresolved. Do not substitute interface screenshots, plans, or a single summary figure for actual results.
Flux Art supports commercial use and can be used for e-commerce product displays, marketing materials, and commercial design deliverables. Handle input photos, people, trademarks, and product claims according to the actual project materials. Checking input asset rights and product authenticity is a separate delivery task from the platform’s support for commercial use.
Sources and related workflows
For model background, see OpenAI’s official introduction to ChatGPT Images 2.5, retrieved on 2026-10-05. Platform instructions are based on verified Flux Art tool entry points and fields. This article provides production steps and an example to be carried out; it does not invent generation test results, pass rates, savings, or customer outcomes.
Find the corresponding tools in the Flux Art AI E-commerce workspace. For related tasks, continue with the related workflow tutorial to learn more about production and review methods.
Adobe: Transform images, shapes, and paths; retrieved on 2026-10-05.
Related source entry in the original: Related tool or source 1