 Flux Art
Pump images should distinguish the lock, press, and dust-cap states confirmed by the product team. GPT Image 2.5 in Flux Art can create editing candidates, while the product image suite and A+ detail page offer separate entry points. Use the corresponding real product photos to verify state names, nozzle direction, and visible stem height; a generated image cannot establish whether the mechanism is locked.
Use approved materials for state names
First list the states this product actually supports and has been photographed in. Do not assume every pump head has the same twist-lock mechanism. Match the product team's terminology to each photo number. If you have photos but no state descriptions, label only the visible appearance for now; do not call it locked. Group different bottle types, refills, and shipping packages separately. Do not invent missing states just to make a three-image set.
Compare appearances from the same angle
Check the nozzle direction, exposed stem height, dust-cap position, and bottle label separately. A change in viewing angle can affect how height and orientation appear, so align camera positions before comparing. If the views differ, keep the angle labels and do not treat visual differences as changes to the mechanism. Match the reference appearance; do not infer the pump travel from a candidate image.
Avoid duplicate cap and pump combinations
When the dust cap is removed and placed beside the bottle, it should be the cap from that same unit. Do not leave a second cap on the pump head. The model does not need to reconstruct areas hidden by the cap in a particular state. Create separate candidates from the source photo for each correct state, then check the bottle neck, label, and pump connection. If there is no usable angle, take another photo instead of trying to describe missing structure in text.
Deliver a state matrix, not proof of function
For each state, save the approved name, source photo, candidate, and final image, and list the visual changes made. Check product descriptions and captions together so an image showing the pump being pressed is not described as a shipping state. Images show visual correspondence only. Claims about sealing, leak resistance, usage, and the amount dispensed per pump must come from current product materials, not AI images.
Tools and materials for this workflow
Do not remove product structure with reflections
Clear bottles, frosted bottles, and pump heads have different material properties. If removing reflections also erases the bottle opening, liquid level, or label edges, the retouch is not acceptable. Use real photos to confirm volume and material. You can replace the background, but do not change the product's color or capacity in the process.
| What this task needs to clarify | Details |
|---|---|
| Inputs or conditions | Real product photos and verified information about bottle type, pump head, label, capacity, texture, and approved claims |
| Relevant actions | White-background images, key selling points, ingredient scenes, texture close-ups, and detail-page modules |
| Items to check | Exaggerated claims, incorrect ingredients, packaging text errors, and texture that does not match the real product |
Claims must come from product materials, not the mood
Business and compliance teams must confirm whether claims such as “repairs” or “soothes sensitive skin” are acceptable. A floral background can also imply ingredients the product does not contain. In the input materials, distinguish ingredients that are actually present, usage guidance, and claims that must not appear; check the result against them afterward.
Flux Art is operated by MORNING STAR INDUSTRY LIMITED. It is a multi-model AI visual creation and production platform. One account can access more than 50 third-party image and video models, as well as ecommerce tools for product image sets, background replacement, retouching, and virtual try-on. Model pages and ecommerce tools are separate entry points. If a task specifically requires GPT Image 2.5, confirm the selected model in its model-specific entry point; do not attribute results from every tool to that model.
Turn skincare product images into concrete steps
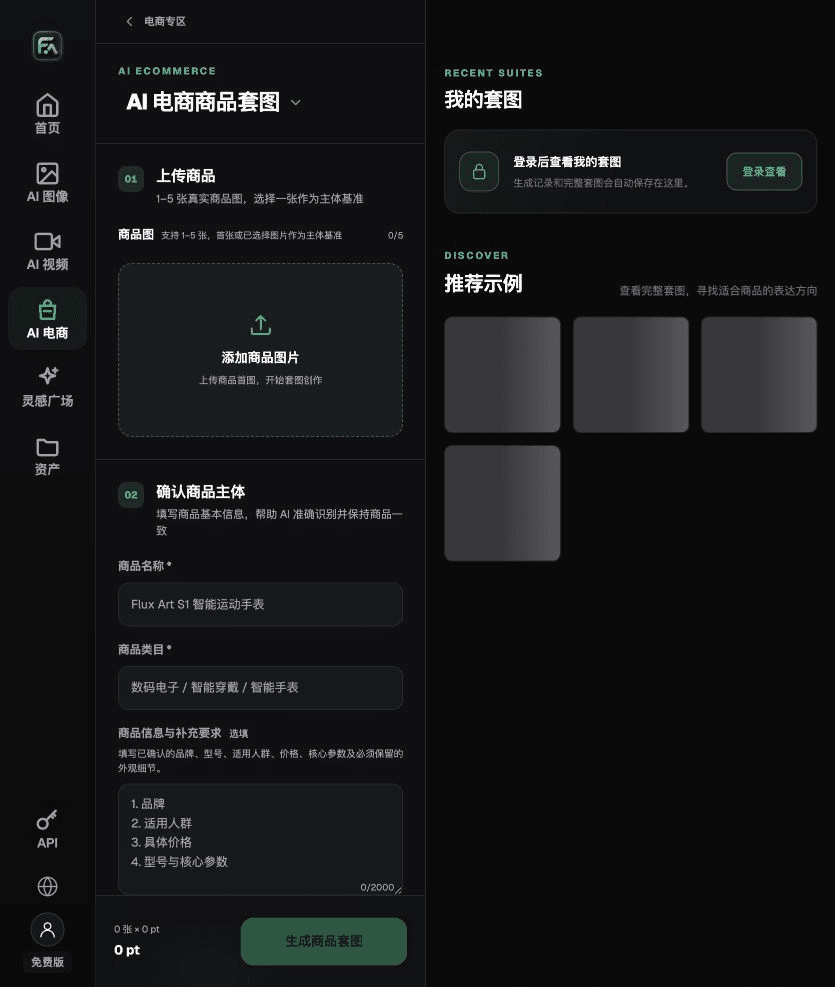
To create skincare product images, complete the relevant steps in the Product Image Suite: upload 1–5 real product photos, then enter the product name, category, factual information, and details that must be preserved. Select modules such as a hero image, white-background main image, key selling points, usage scenes, or close-up details, and set the aspect ratio, resolution, and language.
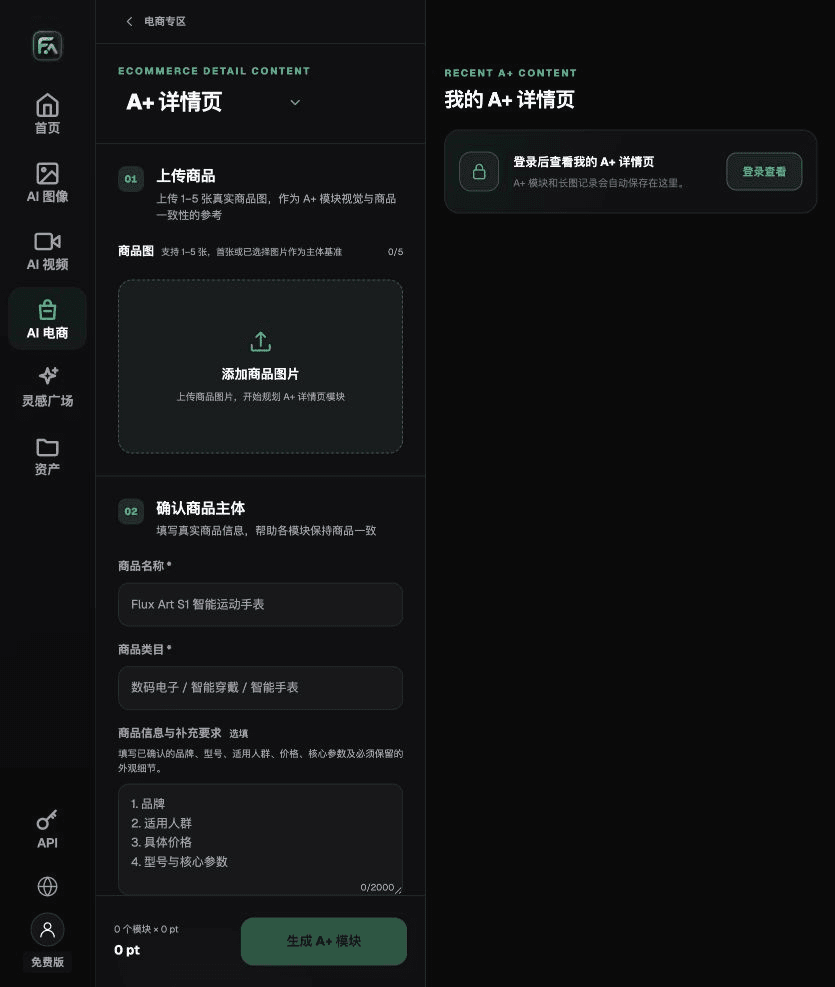
To create skincare product images, complete the relevant steps on the A+ Detail Page: upload 1–5 product photos or consistency reference images, and enter approved product facts and selling points. Select the required A+ content modules and generation specifications, then review the title, specifications, selling points, and images in each module.
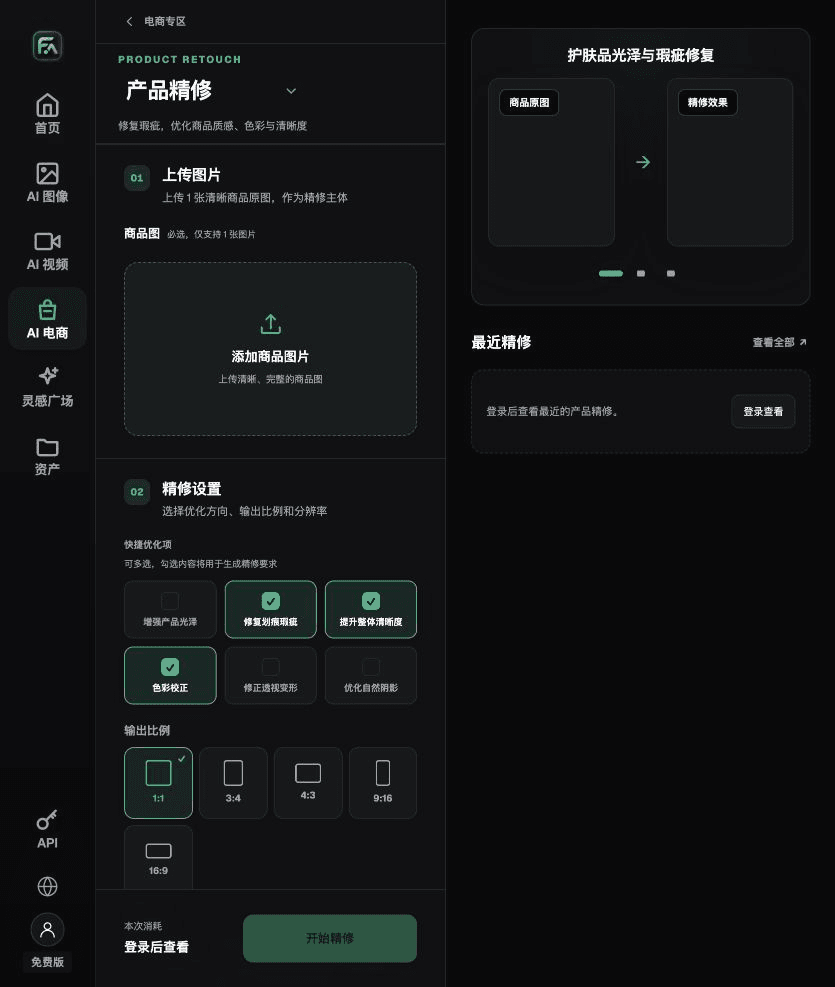
To create skincare product images, complete the relevant steps in Product Retouch: upload one product photo with a clear subject and no severe obstructions. Select gloss, scratches/imperfections, clarity, color correction, perspective distortion, and natural shadow as needed; you do not have to enable every option.
For skincare product images, also check for exaggerated claims, incorrect ingredients, packaging text errors, and texture that does not match the real product. Review this delivery checklist alongside the guidance above on preserving product structure when removing reflections.
A prompt to try for this task
Create an ecommerce image for a skincare product. Use the uploaded real product photo as the subject, preserving the bottle type, pump head, label, capacity, texture, and approved claims. Generate only one product image that matches the state list in this article and the current real reference. Target audience: [fill in]. Placement: [fill in]. Lighting: [fill in]. Do not invent specifications, accessories, certifications, claims, or product structure.

Check these items before delivery
After creating skincare product images, review the final files for exaggerated claims, incorrect ingredients, packaging text errors, and texture that does not match the real product. If you continue with other modules or SKUs, carry forward the approved evidence for the product itself and verify each new task separately. Check the current page for submission costs and available specifications.

From production to delivery-ready files
After completing this task, archive the original product photos, approved copy, selected tool or model, input instructions, candidate versions, and final exports together. Keep the originals separate; revisions should not overwrite the product references. Include the SKU or task number in filenames so the operations team can identify the sales version associated with each image. Before delivery, check resolution, cropping, captions, and links for each actual placement. Passing one large image does not mean it is ready for every placement.
Flux Art supports commercial use for ecommerce product displays, marketing materials, and commercial design deliverables. Handle input photos, people, trademarks, and product promotion information according to the actual project materials. Verifying rights to input materials and product authenticity are separate delivery tasks from the platform's commercial-use support.
Sources and related workflows
For model background, see OpenAI's official introduction to ChatGPT Images 2.5, retrieved on 2026-10-02. Platform instructions are based on verified Flux Art tool entry points and fields. This article provides production steps and an example to try; it does not claim generation tests, pass rates, cost savings, or customer results.
Find the relevant tools in the Flux Art AI Ecommerce Workspace. For related tasks, read the related product production tutorial for more on creating and checking product images.
Related link in the original draft: related tool or source 1