 Flux Art
Tmall series images need consistent brand colors while preserving the true materials of different products. When creating candidates with Flux Art’s GPT Image 2.5, treat brand color blocks, ambient colors, and the product’s own colors as three separate layers: check the standard color against the approved swatch, and the product against the original product photo. Do not recolor both with an adjustment applied to the entire image.
Divide One Hero Image into Three Color Zones
As a layout example, use a frosted cup and a glossy cup. First mark the brand title bar, background environment, and cup body as three separate zones in the working file. The title bar should use the same approved color value throughout. Highlights and shadows on each cup should remain close to its own original photo; do not make the glossy cup look frosted just to make the pair look uniform. Create a tracking sheet and record the reference file, permitted edits, and final approver for each zone. If the brand zone contains no product, you can restore its standard color separately while retaining the original photo as the basis for the product zone. Your team maintains this tracking sheet; Flux Art does not provide it as an automatic approval feature.
Include the Color Space in Swatches and Sample Away from Text and Shadows
Writing down only “brand blue” is not enough. Hand off the approved digital swatch together with its intended use; on-screen assets and print color proofs are different deliverables. If the project uses sRGB, record that condition. Do not treat the same numeric values as exactly the same color when the color space is unspecified. When checking a flat color block, sample an interior area without text or transparent overlays, away from antialiased edges. Product surfaces have variations in light and shade, so not every pixel needs to match the swatch. Record file color-value checks separately from visual checks on screen, so that a perceived color cast does not lead to a filter being applied to the entire image.
Set the Composition First, Then Restore Brand Color in an Editable Area
You can ask GPT Image 2.5 to preserve the cup’s material and reflections based on the original photo, leave a solid-color area for the title, and keep blue background light off the cup. Approve the subject and negative space first, then fill the separate color block with the brand standard color in the design file. For local revisions, specify that only the color block or surrounding environment should change, then check the product edges for color bleed in the output. This lets you explore compositions with the model and keep the standard color on a layer that can be checked. Including a color code in a prompt does not mean the file has passed color-sampling checks.
Check the Template with the Two Most Different Products in the Series
Do not validate the template with only two products made of the same material. Choose one highly reflective product and one light-absorbing product, then check the brand bar, subject outline, areas adjacent to the background, and final export for each. If the brand bar is correct but the product is distorted, revise the corresponding product area. If the product is correct but the brand bar is inconsistent, unify that layer in the layout file instead of recreating every approved subject. Keep the swatch version, both original photos, the template, export color settings, and results for each zone in the delivery package. If the brand color changes later, you can identify the affected color blocks without incorrectly recoloring the entire batch of products.
Prepare the Relevant Tools and Assets
Brand Color Is Not a Style Adjective
Include the approved color values, logo clear space, and type hierarchy in the asset package. Series can use different settings, but the brand mark should not be redrawn arbitrarily. Product material in real photographs takes priority over style requests; do not turn matte plastic into metal to make it look more premium.
| Key point to clarify | Details |
|---|---|
| Inputs or conditions | Brand-approved assets, product images, current Tmall category and promotion rules |
| Relevant actions | Create the first image in the product set and a white-background image, then standardize lighting and texture with product retouching; proofread brand text separately |
| Required checks | Brand guidelines, subject proportions, background, promotional copy, price information, and category-specific requirements |
Flux Art is operated by MORNING STAR INDUSTRY LIMITED. It is a multi-model AI visual creation and production platform. One account can access 50+ third-party image and video models, and the platform offers ecommerce tools for product sets, background replacement, retouching, and virtual apparel try-on. Model pages and ecommerce tools are separate entry points. If the task specifically requires GPT Image 2.5, confirm the selected model in the relevant model entry point; do not attribute results from every tool to that model.
Archive Promotional and Standard Versions Separately
Promotional copy, prices, and dates can change quickly. Save a standard hero image without promotional text, then create a separate version for each current promotion. Include the product SKU, placement, and promotion dates in the delivered file to prevent the team from uploading expired offers by mistake.
Turn Tmall Hero Image Work into Tool Actions
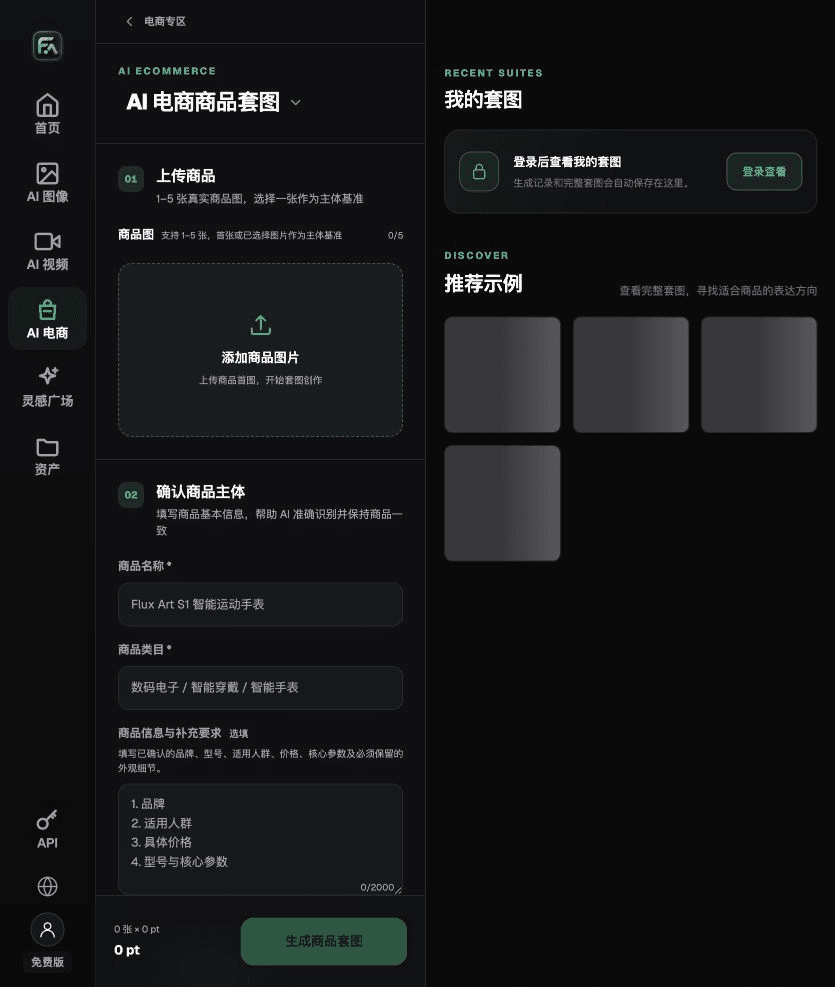
To create Tmall hero images, complete the relevant steps in Product Set: upload 1–5 real product images, enter the product name, category, factual details, and details that must be preserved; choose modules such as product hero image, white-background hero image, key selling points, usage scenarios, and close-up details; then set the aspect ratio, resolution, and language.
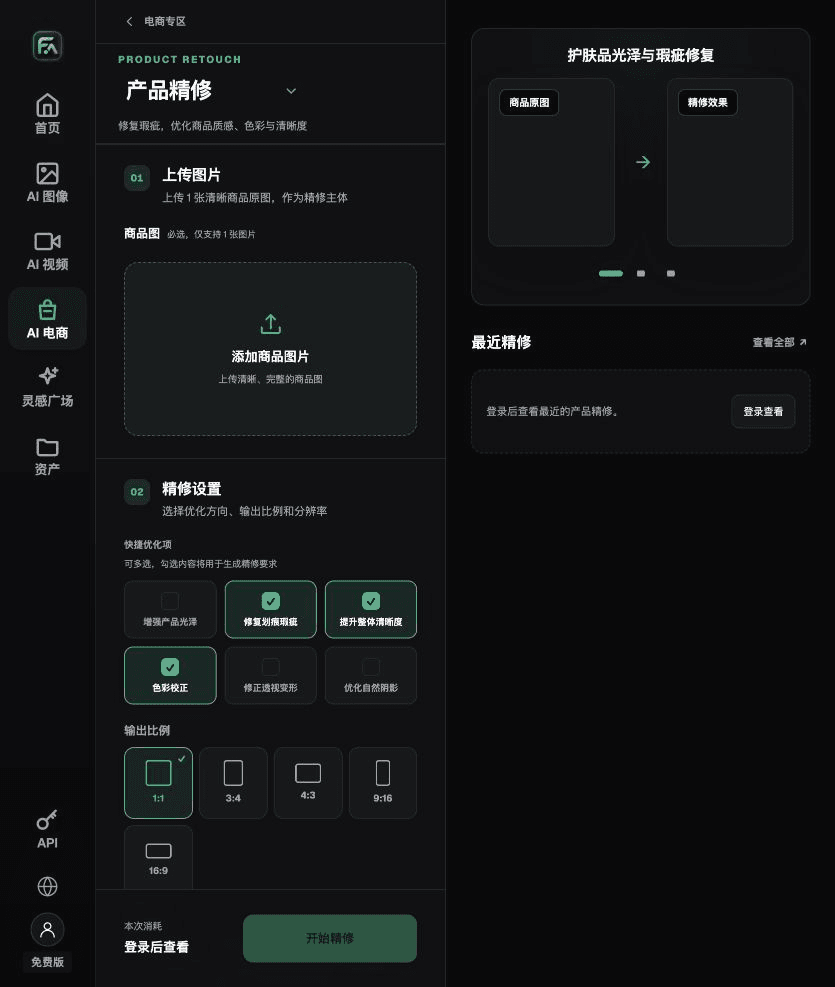
To create Tmall hero images, complete the relevant steps in Product Retouch: upload one product image with a clear subject and no severe obstruction; select gloss, scratches/defects, sharpness, color correction, perspective distortion, and natural shadow as needed. You do not need to enable every option.
For Tmall hero images, also check brand guidelines, subject proportions, background, promotional copy, price information, and category-specific requirements. Review this delivery checklist together with the requirements above under “Brand Color Is Not a Style Adjective.”

A Prompt to Try for This Task
Create a Tmall hero image based on the uploaded real product. Preserve the product outline, number of parts, packaging text, logo, true colors, and materials. The image is for [enter channel and placement], with an aspect ratio of [enter ratio]. The only exact copy is “[enter text].” Do not add products, accessories, certification marks, or promotional claims.

Check These Items Before Delivery
After creating the Tmall hero image, check the final file against the brand guidelines, subject proportions, background, promotional copy, price information, and category-specific requirements. If you continue with other modules or SKUs, carry forward the approved subject evidence and validate each new task separately. Check the current page for submission consumption and available specifications.

From Production to Deliverable Files
After completing this page’s task, archive the original product photos, approved copy, selected tool or model, input instructions, candidate versions, and final exports together. Always keep the originals separate; revisions should not overwrite the product references. Link filenames to the SKU or task number so the operations team can find the sales version for each image. Before delivery, check resolution, cropping, captions, and links for the actual placements. Approval of one large image does not mean it is approved for every placement.
Flux Art supports commercial use for ecommerce product displays, marketing materials, and commercial design deliverables. Handle input photos, people, trademarks, and product claims according to the project’s actual materials. Verifying rights to input assets and product authenticity is a delivery responsibility separate from the platform’s commercial-use support.
Sources and Related Workflows
For model background, see OpenAI’s official introduction to ChatGPT Images 2.5, retrieved on 2026-09-30. Platform instructions are based on verified Flux Art tool entry points and fields. This article provides production steps and examples to be carried out; it does not claim fictional generation tests, pass rates, savings, or customer results.
Find the relevant tools in the Flux Art AI Ecommerce Workspace. For related tasks, continue with the related product creation tutorial for more production and checking guidance.
Related entry in the original draft: Related tool or source 1