 Flux Art
When creating event posters with GPT Image 2.5, number the teaser, live-event, and post-event standard versions separately. Flux Art can create product backgrounds and event layouts. This guide focuses on mapping each stage to its placement and replacement time, so old dates or prices for offers that have not started are not published early.
Define at Least Three States for an Event
The teaser version introduces an upcoming event, the live version shows currently approved information, and the post-event version restores the standard content. Whether you need all three depends on the actual event; this guide does not design discounts for your business. Record the stage, copy version, product version, placement, and owner in a table. Put the status in internal filenames and the schedule so readers do not have to guess which day a poster is for.
Specify Complete Start and End Times
Use the approved event schedule for the date, time, and applicable time zone. For campaigns running across regions, list the actual switch time for each channel separately. Do not treat the poster's completion time as its launch time, or assume the expiration date means midnight at the start of that day. If the rules are unclear, obtain the approved details before laying out the poster. This sample workflow includes no real prices, offers, or platform timing promises.
Freeze the Background and Export Copy for Each Stage
After creating the product and background in Flux Art, keep a background version without event text. Organize the copy for each stage in editable layers. Check the price, date, unit, and applicable terms with every export, and make sure the product packaging has not been rewritten. Use the same event ID with a different placement suffix for each file. Avoid names such as final and final-2 that do not explain what each file is for.
Replace Every Placement at the End, Not Just the Main File
List every actual placement, such as the homepage banner, social media images, and detail-page modules. At the end of the event, confirm the displayed file at each placement. Save the exact filenames for the live version and the standard fallback version, then check the pages after replacement. Your own operations system handles scheduling and fallback; this guide does not claim the platform has built-in automatic scheduled publishing. Record which placements have been replaced and which remain pending. Updating the asset folder alone does not mean the campaign has ended across all channels.
Prepare the Relevant Tools and Assets
A Copy Checklist Works Better Than a Long Promo
List the headline, price, date, and additional terms on separate lines, and specify which items must appear. Do not fill in information that was not provided. If the product already has packaging text, say that it must not be rewritten, so poster copy does not end up on the bottle or box.
| What to Specify | Details |
|---|---|
| Inputs or conditions | Approved event copy, price, date, product images, and safe area |
| Action | First use the GPT Image 2.5 generator to set the composition and exact copy placement, then bring the product subject and selling-point assets into the composite-image workflow |
| Must-check items | Check every character and number in the headline, price, date, units, brand name, and disclaimer |

Check Information Hierarchy Before Decorative Type
Give the headline, product, and offer clear positions. At mobile display size, the price should still be easy to read, and the date should not disappear into the background texture. Long terms and fine-print notes can be added in post-production; you do not need to regenerate the product just to fix a typo.
Flux Art is operated by MORNING STAR INDUSTRY LIMITED. It is a multi-model AI visual creation and production platform. One account can access more than 50 third-party image and video models, along with ecommerce tools for product image sets, background replacement, retouching, and virtual apparel try-ons. Model pages and ecommerce tools are separate entry points. If a task specifically requires GPT Image 2.5, confirm the selected model in its dedicated model entry point; do not attribute the results of every tool to that model.
Turn a Chinese Promotional Poster Brief into Actions
In the GPT Image 2.5 feature page, explicitly select the model and generation or editing mode. Start by validating one representative Chinese promotional poster task.
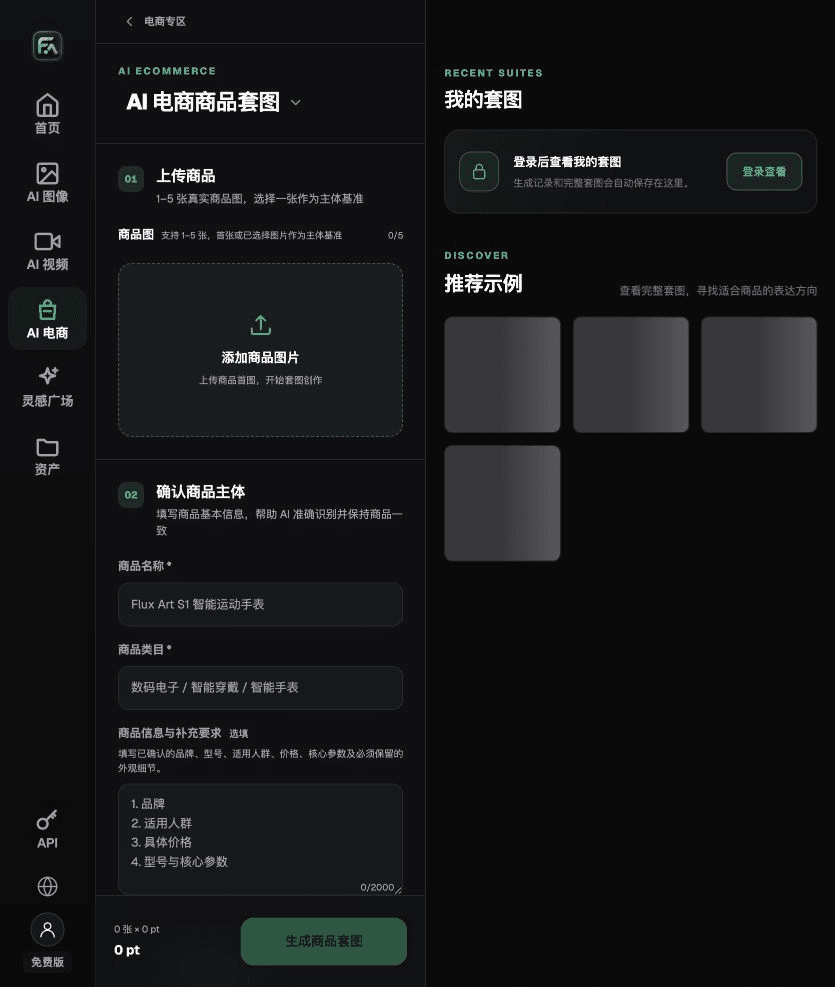
For a Chinese promotional poster, complete the relevant steps in Product Image Sets: upload 1–5 real product images, enter the product name, category, factual details, and features that must be preserved; choose modules such as the product hero image, white-background main image, key selling points, usage scenarios, and detail close-ups; then set the aspect ratio, resolution, and language.
For Chinese promotional posters, also check every character and number in the headline, price, date, units, brand name, and disclaimer. Review this delivery checklist together with the requirements in “A Copy Checklist Works Better Than a Long Promo.”

A Prompt to Try for This Task
Create a Chinese promotional poster: the product subject must come from the uploaded image and must not be altered; exact headline: “[Fill in]”; price: “[Fill in]”; date: “[Fill in]”; place each at [position]. Preserve the safe area. Do not add other text, logos, watermarks, or unapproved claims.

Check These Items Before Delivery
After creating the Chinese promotional poster, review the final file character by character and number by number for the headline, price, date, units, brand name, and disclaimer. If you continue with other modules or SKUs, reuse the approved product reference and validate each new task separately. Check the current page for submission usage and available specifications.

From Production to Delivery-Ready Files
After completing this task, archive the original product images, approved copy, selected tool or model, input instructions, candidate versions, and final exports together. Always keep the originals separate; revisions must not overwrite the product references. Include the SKU or task ID in filenames so the operations team can find the sales version associated with each image. Before delivery, check resolution, cropping, captions, and links for each actual placement. Passing review for one large image does not mean every placement has passed.
Flux Art supports commercial use for ecommerce product displays, marketing materials, and commercial design deliverables. Handle input photos, people, trademarks, and product claims based on the actual project materials. Verifying rights to input assets and product authenticity are separate delivery checks from the platform's commercial-use support.
Sources and Related Workflows
For model background, see OpenAI's official introduction to ChatGPT Images 2.5, retrieved on 2026-09-30. Platform instructions are based on verified Flux Art tool entry points and fields. This article provides production steps and examples to carry out; it does not invent generation test results, pass rates, savings, or customer outcomes.
Find the relevant tools in the Flux Art AI Ecommerce Studio. For related tasks, read this related product creation guide for more on production and review methods.
Related source entry: related tool or source 1