 Flux Art
GPT Image 2.5 round-bottle packaging images require checking the front label, side text, and label seam together. Flux Art can edit backgrounds and lighting and create presentation candidates. This guide maps approved flat artwork to real product views to help prevent a correct front from masking changed side text, capacity, or seals.
What Flat Label Artwork and Bottle Photos Each Show
Approved flat artwork specifies the exact text, logo, and information layout; real product photos show label placement, curvature, and seams. Neither reference can replace the other: flat artwork alone cannot show how the label fits in practice, while glare in photos can make small text hard to read. Record the version of each input and confirm that the bottle specifications match the label version before creating candidates.
Set Up Three Checks: Front, Side, and Seam
Check the brand name, capacity, and primary identifying area on the front; check the visible lines and how they wrap around the side; and verify that overlap or gaps at the seam match the actual package. Do not flatten all side text toward the camera or turn missing content into decorative symbols. If a view has no photo, take one first; never treat a model-generated back view as approved packaging.
Reduce Glare Without Erasing Text Structure
When adjusting photographic glare that obscures information, record the original label outline, baselines, and curvature direction. For final artwork that needs precise text, use approved assets to check and restore the label in a layered file, then review the perspective and curvature. You cannot determine barcode validity from appearance alone: use the real asset and follow the business verification process. Enlarging pixels cannot recover an unknown code.
Keep Every Image in the Set on the Same Packaging Version
Link the three views to the bottle type, capacity, label version, and original photo IDs. When a label changes, identify and replace every affected view rather than updating only the front hero image. After export, check that the type, capacity, seals, and seams are consistent across the set. Save sales presentation files separately from prepress production files; a visual image does not replace dieline, bleed, or print approval.
Relevant Tools and Asset Preparation
If Packaging Text Is Unclear, Provide Better Inputs First
Small bottle text, ingredient lists, and barcodes are not decorative textures. If the original image has glare or is blurry, take another photo or provide the approved artwork; do not ask the model to guess missing content. Curved labels need particular attention to letterforms, line spacing, and both edges. A correct front does not mean the sides are correct.
| What to Specify | Details |
|---|---|
| Inputs or conditions | High-resolution front and back packaging photos, exact text, dieline references, and brand colors |
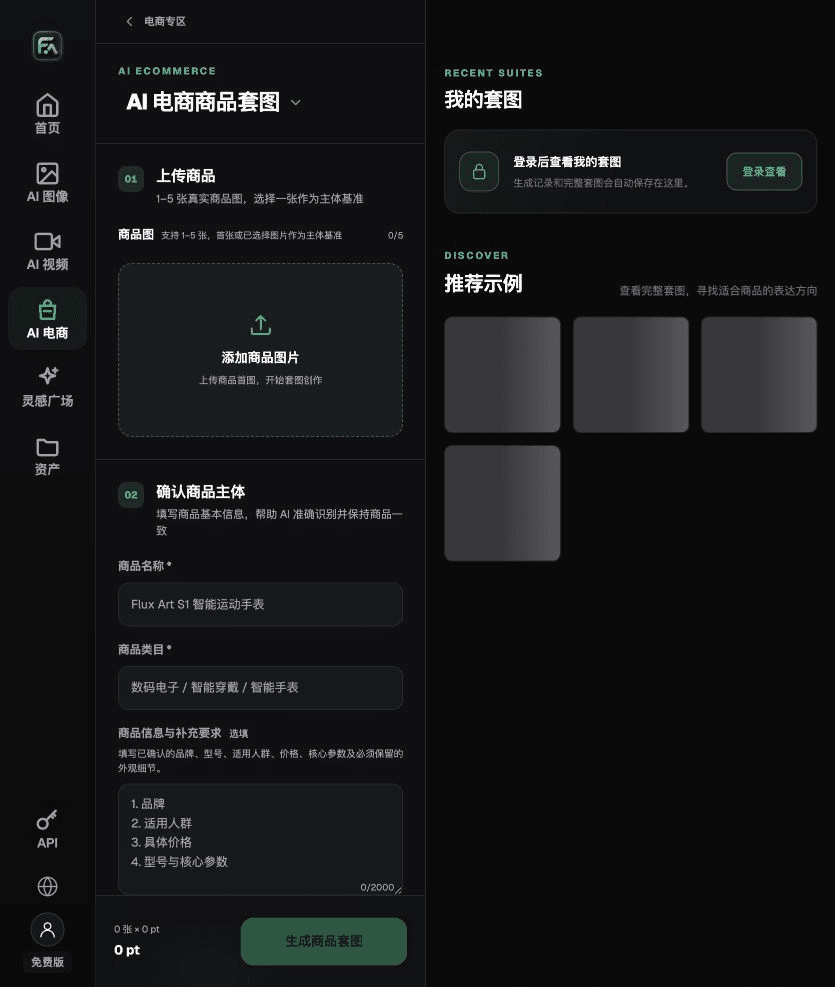
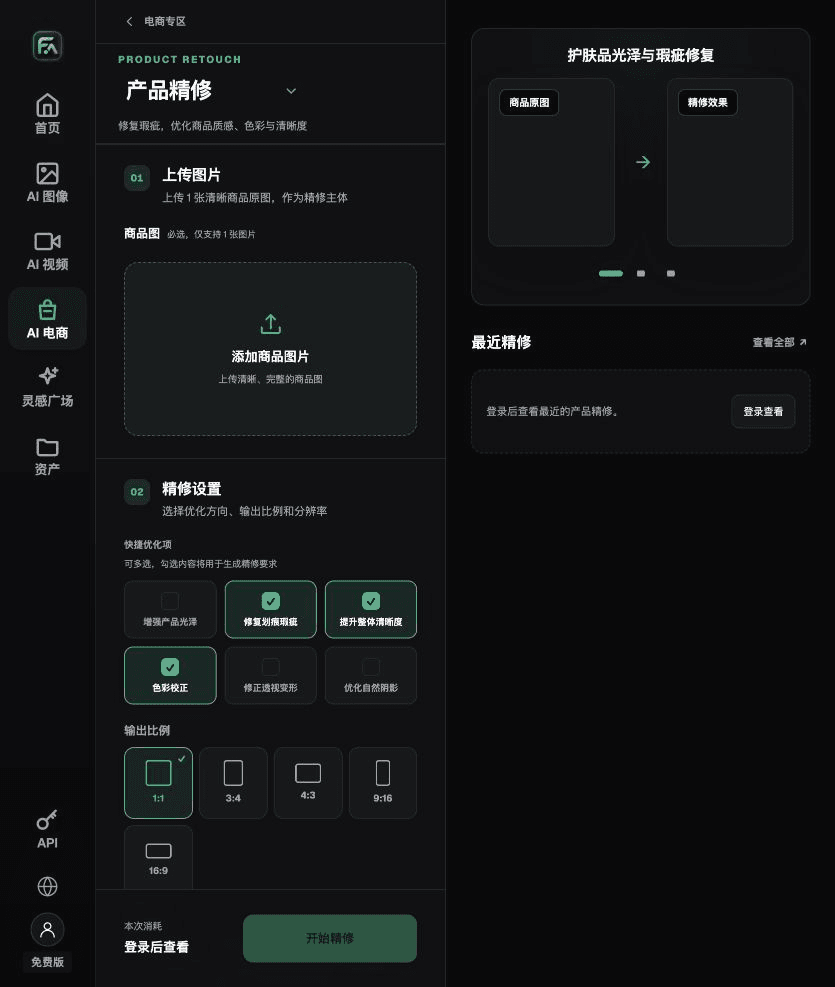
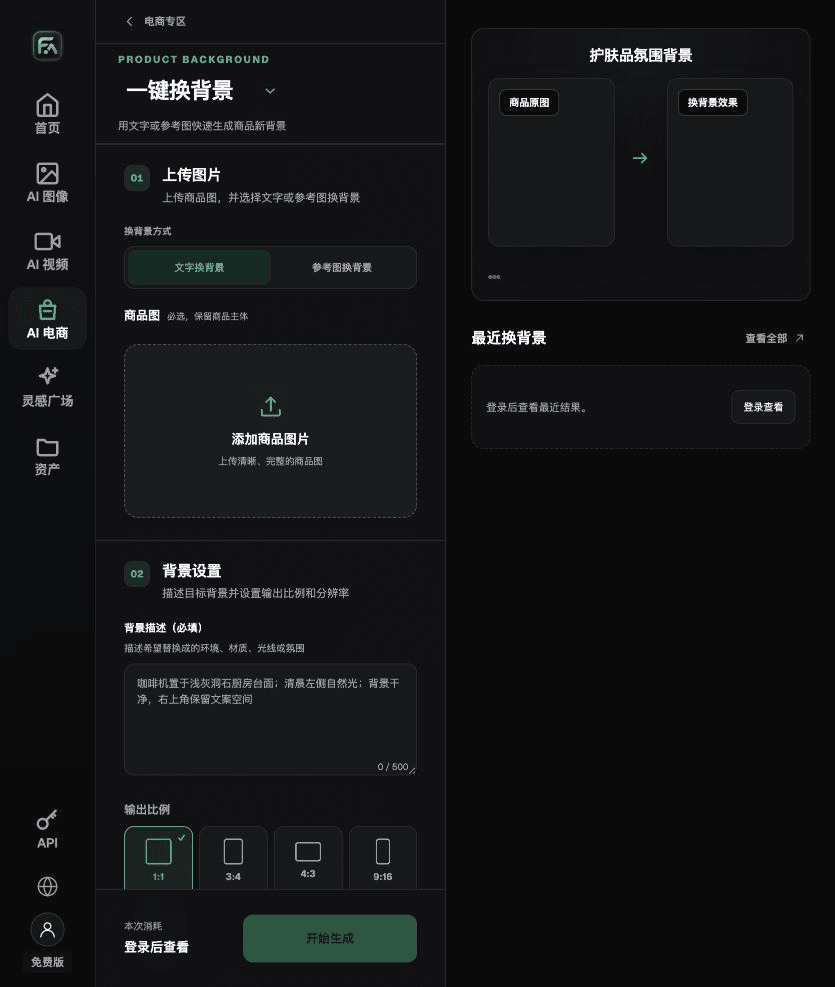
| Relevant actions | First create white-background, selling-point, and detail images with the product image suite; then change the scene or retouch glare and perspective as needed |
| Must-check items | Packaging text, barcode, net contents, ingredients or warnings, logo, seals, and box structure |
A Concept Image Cannot Confirm Dieline Dimensions
Plausible box perspective does not prove that the actual fold lines, bleed, or cutting layout are correct. Use the production dieline and design source files for printing. AI is better suited to exploring display arrangements and photography atmosphere; for commercial images that need exact lettering, restore the approved label during post-production.
Flux Art is operated by MORNING STAR INDUSTRY LIMITED. It is a multi-model AI visual creation and production platform where one account can access 50+ third-party image and video models. Its e-commerce tools include product image sets, background replacement, retouching, and virtual try-on. Model pages and e-commerce tools are separate entry points: when a task specifically requires GPT Image 2.5, confirm the selected model in its model page instead of attributing results from every tool to that model.
Turn Product Packaging Visuals Into Practical Steps
For product packaging visuals, complete the relevant steps in Product Image Suite: upload 1–5 real product photos; enter the product name, category, factual information, and details that must be preserved; choose modules such as product hero image, white-background main image, key selling points, use scenarios, and detail close-ups; then set the aspect ratio, resolution, and language.
For product packaging visuals, complete the relevant steps in Product Retouch: upload one product photo with a clear subject and no major obstruction; select gloss, scratches or blemishes, clarity, color correction, perspective distortion, and natural shadow as needed. You do not need to enable every option.
For product packaging visuals, complete the relevant steps in One-Click Background Replacement: upload a product photo and describe the background in text, or upload a background reference image you are authorized to use. Specify the setting, surface material, light direction, atmosphere, and contact shadows, and list the product details that must not change.
For product packaging visuals, also check packaging text, barcodes, net contents, ingredients or warnings, logos, seals, and box structure. Review this delivery checklist alongside the requirements in “If Packaging Text Is Unclear, Provide Better Inputs First.”
A Prompt to Try for This Task
Create a product packaging visual. Face the front of the package toward the camera. Preserve the box or bottle structure, label position, brand name, net contents, barcode, seal, logo, and brand colors. Adjust only [background / lighting / perspective]. Do not rewrite or fill in small text that is hard to read.

Check These Items Before Delivery
After creating a product packaging visual, check the final file for packaging text, barcode, net contents, ingredients or warnings, logo, seal, and box structure. If you continue with other modules or SKUs, carry forward the verified product evidence and validate each new task separately. Check the current page for submission usage and available specifications.

From Production to Delivery-Ready Files
After completing the task in this guide, archive the original product photos, approved text, selected tool or model, input instructions, candidate versions, and final exports together. Always keep the originals separate; revisions must not overwrite the product evidence. Include the item number or task ID in filenames so operations teams can find the sales version associated with each image. Before delivery, check resolution, cropping, captions, and links for each actual placement. Passing review on one large image does not mean every placement is ready.
Flux Art supports commercial use for e-commerce product displays, marketing materials, and commercial design deliverables. Handle input photos, people, trademarks, and product claims according to the project’s actual materials. Verifying rights to input assets and product authenticity are separate delivery requirements from the platform’s commercial-use support.
Sources and Related Workflows
For model background, see OpenAI’s official introduction to ChatGPT Images 2.5, retrieved on 2026-09-30. Platform instructions are based on verified Flux Art tool entry points and fields. This article provides production steps and examples to execute; it does not claim any generation tests, pass rates, savings, or customer results.
Find the relevant tools in the Flux Art AI E-commerce Workspace. For related tasks, continue with the product creation tutorial to learn more about production and review methods.
Related link in the original: Related tool or source 1