 Flux Art
GPT Image 2.5 layered outerwear images need to distinguish the roles of the jacket, inner layer, and model reference. Flux Art can create on-model candidates from garment references. This guide focuses on checking collar layers, sleeve ownership, and included items when the jacket is open, so the model’s original clothes do not become part of the new product design.
Assign Each Garment Its Own SKU and Role
Record the SKU, color, reference images, and sale status for the jacket and inner layer. Use the model reference only for body shape and pose. If only the jacket is for sale, treat the inner layer as styling information and do not include it in the set quantity. Prepare genuine references showing the jacket both open and closed. Check the placket direction, buttons, and zipper; do not infer the full lining from a single closed-jacket photo.
Make Every Collar Layer Easy to Explain
Check the boundaries from the outer lapel to the inner garment’s collar, one layer at a time. The jacket lapel must not suddenly become a shirt collar, and a round-neck inner layer must not be changed into an unsold turtleneck. Specify which areas belong to the jacket and which to the inner layer. Edit only one layer at a time, preserving parts that have already been approved. If two references conflict, have the merchandising team confirm the styling instead of letting the model blend them automatically.
Do Not Copy Cuffs or Hems Without Evidence
Check which garment each visible cuff belongs to, and whether the number of layers, color, and length match the actual outfit. Use real styling references to determine how much of the inner layer’s hem is visible. Do not shorten the jacket just to make the legs look longer. If an arm obscures the boundary, prepare another view that clearly shows the layers; do not guess about a hidden layer or mark it as approved.
Deliver Open and Closed Versions as Separate States
Name the open and closed versions separately, then compare the jacket length, placket direction, and pocket placement side by side. The two images can show different styling, but do not give one a belt or change the inner layer in the other while keeping the same description. Include a garment list and an included-items statement in the delivery package so the merchandising team can choose images. Use measured source data for sizing and fit information; do not infer it from AI-generated body proportions.
Prepare the Relevant Tools and Assets
Do Not Let the Model’s Old Clothes Define the New Fit
The tight silhouette of the model’s original clothes can interfere with the new garment’s relaxed fit. Prompts should let the product reference determine the cut, while the model reference guides only body type and pose. If an arm covers a chest graphic, adjust the pose or provide a clearer reference rather than guessing what the graphic looks like.
| What This Task Must Clarify | Details |
|---|---|
| Inputs or conditions | Front view of the garment; add back and detail views if needed, plus an authorized model photo |
| Relevant action | Add the necessary garment views to the clothing set first, then dress the model; change the pose separately if needed |
| Items to check | Fit, pattern continuity, fabric drape, button count, pocket placement, and perceived size |
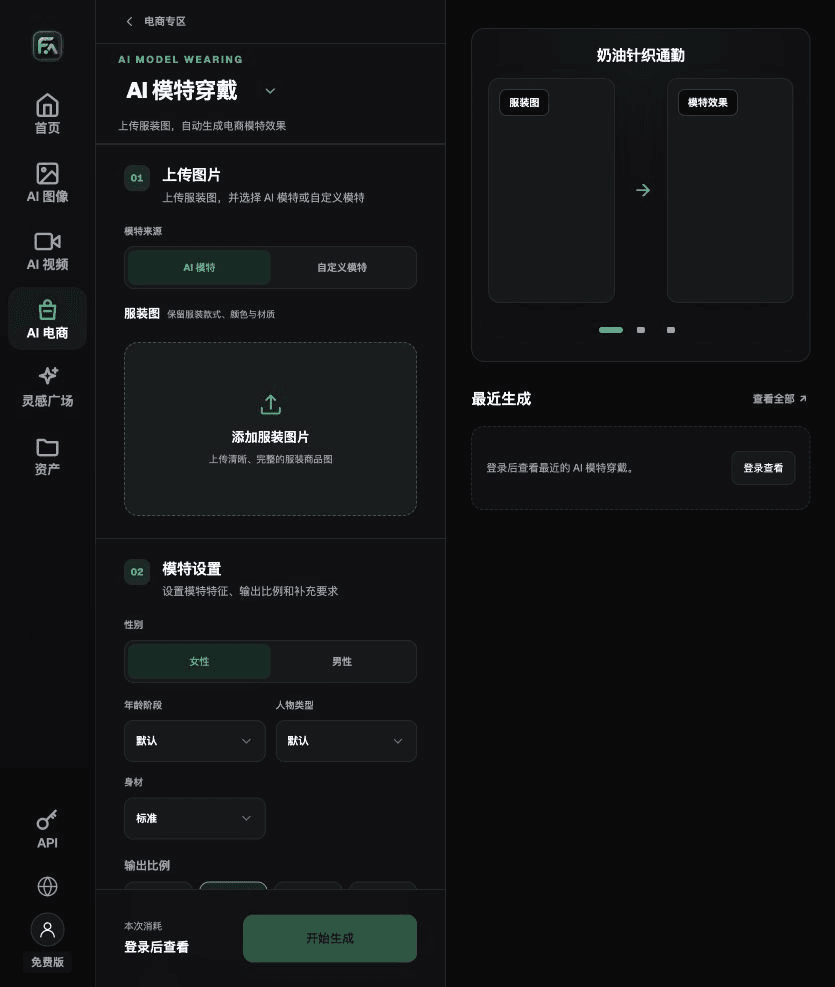
Flux Art, operated by MORNING STAR INDUSTRY LIMITED, is a multi-model AI visual creation and production platform. One account can access 50+ third-party image and video models, along with ecommerce tools for product image sets, background replacement, retouching, and virtual try-on. Model pages and ecommerce tools are separate entry points. If the task specifically requires GPT Image 2.5, confirm the selected model in its model page; do not attribute every tool’s results to that model.
For Multiple Colors, Lock One Approved Version First
First verify the fit using one genuine color, then create versions in other available colors. Check the fabric and print in every version; do not carry a structural error from the first image across all SKUs. Handle face changes, pose changes, and garment changes separately to make it easier to trace where an error occurred.
Carry Out the Garment Change in the Tool
For a virtual try-on, complete the relevant steps in Model Wearing: upload a garment image, choose an AI model or a custom model, and specify gender, age, appearance, and body type. Set the pose, scene, and lighting, and ask the tool to preserve the garment’s style, color, fabric, and key patterns.
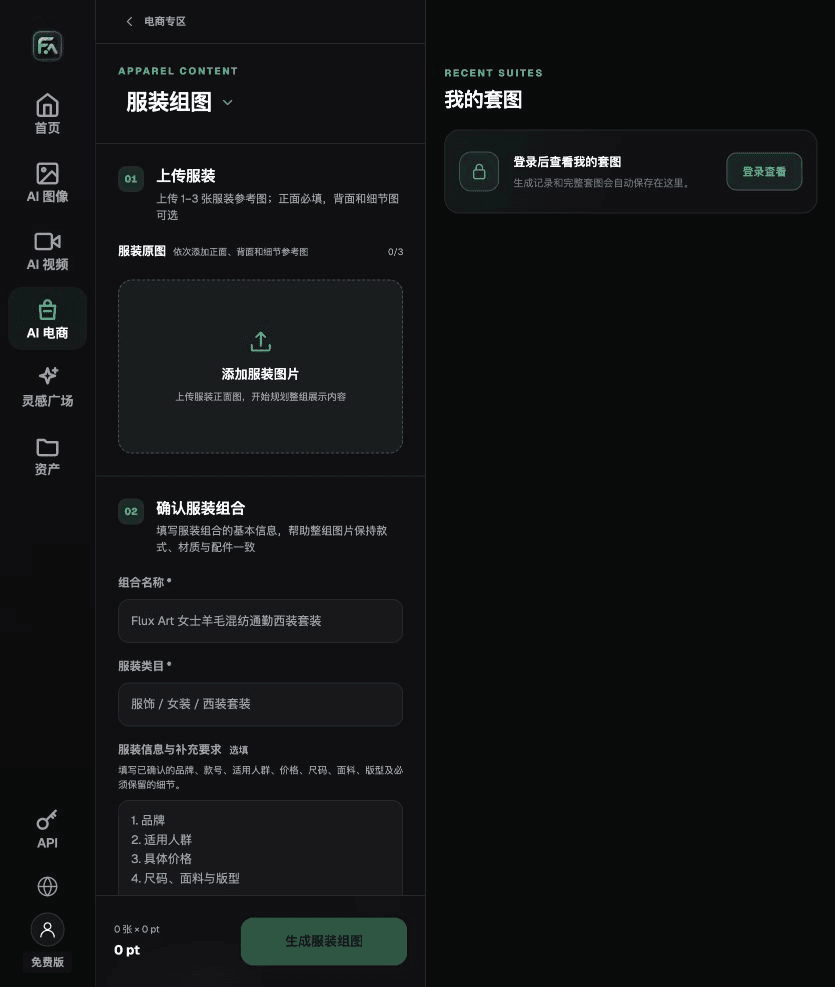
For a virtual try-on, complete the relevant steps in Clothing Sets: upload 1–3 garment images. A front view is required; back or detail views are optional supplements. Specify what to preserve, such as brand, SKU, fabric, fit, size, and pattern, then choose a white-background, 3D, mannequin, or marketing image style.
For a virtual try-on, also check the fit, pattern continuity, fabric drape, button count, pocket placement, and perceived size. Review these delivery items together with the guidance above on keeping the model’s original clothes from defining the new garment’s fit.

A Prompt to Try for This Task
Use the uploaded garment for a virtual try-on. Model: [age, appearance, body type]; pose: [specify]; scene: [specify]. Preserve the garment’s fit, color, fabric, pattern, neckline, cuffs, placket, and button count. Do not add a belt, accessories, or any structure that is not present.

Check These Items Before Delivery
After completing the virtual try-on, inspect the final files for fit, pattern continuity, fabric drape, button count, pocket placement, and perceived size. If you continue with other modules or SKUs, carry forward the approved product evidence and verify each new task separately. Check current submission usage and available specifications on the page.

From Production to Deliverable Files
After completing this workflow, archive the original product photos, approved copy, selected tool or model, input instructions, candidate versions, and final exports together. Keep the originals separate so revisions do not overwrite the product evidence. Include the SKU or task ID in filenames so the merchandising team can match each image to its sales version. Before delivery, check image clarity, cropping, captions, and links for each intended placement. Approval of one large image does not mean every placement is approved.
Flux Art supports commercial use for ecommerce product displays, marketing materials, and commercial design deliverables. Handle input photos, people, trademarks, and product promotional claims according to the project’s source materials. Confirming the rights to input assets and the accuracy of product information remains a separate delivery task from the platform’s commercial-use support.
Sources and Related Workflows
For background on the model, see OpenAI’s official introduction to ChatGPT Images 2.5, retrieved on 2026-09-30. The platform instructions are based on verified Flux Art tool entry points and fields. This article provides production steps and examples to try; it does not claim to report generation tests, pass rates, savings, or customer results.
Find the relevant tools in the Flux Art AI Ecommerce workspace. For related tasks, read the related product production tutorial for more on production and review methods.
Related links in the original draft: Related tool or source 1