 Flux Art
For industrial connector selection diagrams, fix the viewing direction, connector photos, and model text before laying out annotations. Flux Art product image sets can organize white-background and detail images, product retouching can address presentation issues in photos, and GPT Image 2.5 editing can help compare annotation layouts. Connector definitions, dimensions, and compatibility conditions for purchasing must come from technical documentation, not be inferred from generated appearances.
Specify the viewing direction for the connector
The left-right orientation of the same connector may differ when viewed from the mating face, cable side, or equipment side. Record the photo's viewing direction, and use notches, alignment keys, screw holes, and markings as reference points. Products with similar model numbers but different key positions need separate records; do not use one image for both based only on color or housing. If the photo is unclear, take a new one before editing so later steps do not carry forward the wrong orientation.
Preserve alignment features when creating white-background images
When creating white-background and detail images for a product set, list connector orientation, hole count, and alignment notches as features to preserve. Product retouching should focus on exposure, specks, and natural shadows; do not reshape threads or make an asymmetrical connector symmetrical. Place the output beside the original with the same orientation and check especially for left-right mirroring. A tidy appearance does not prove that the image matches the model.
Check labels and leader lines against the approved base image
Confirm the base image's structure first, then arrange labels, names, and leader lines using the technical documentation. Place each label where it is legible and unobstructed, and point the leader line to the correct component. This article does not provide electrical wiring, pin-function, or engineering installation instructions; use the manufacturer's technical documents for the corresponding model. Keep dense specifications as editable text so changing one number does not require regenerating the connector image.
Make every row in the purchasing comparison traceable to a model
Create a table for products in the same series with their model numbers, connector orientations, drawing numbers, and document revisions. Reference the same record for front views, side views, and specification text; do not substitute based on similar names. List only compatibility conditions confirmed in documentation. Do not make new claims just because plugs look similar. Keep the original photos, approved annotated base images, text list, and final exports in the delivery package. When a model number changes, review every place where it appears.
Tools and materials to prepare
Separate presentation images from engineering references
Placing a connector on a workbench is a scene design choice; changing its thread, hole spacing, or flange structure changes the product. Clear photographs and engineering documents define what must not be altered. Do not let the model fill in unclear areas with plausible-looking but unverified structures.
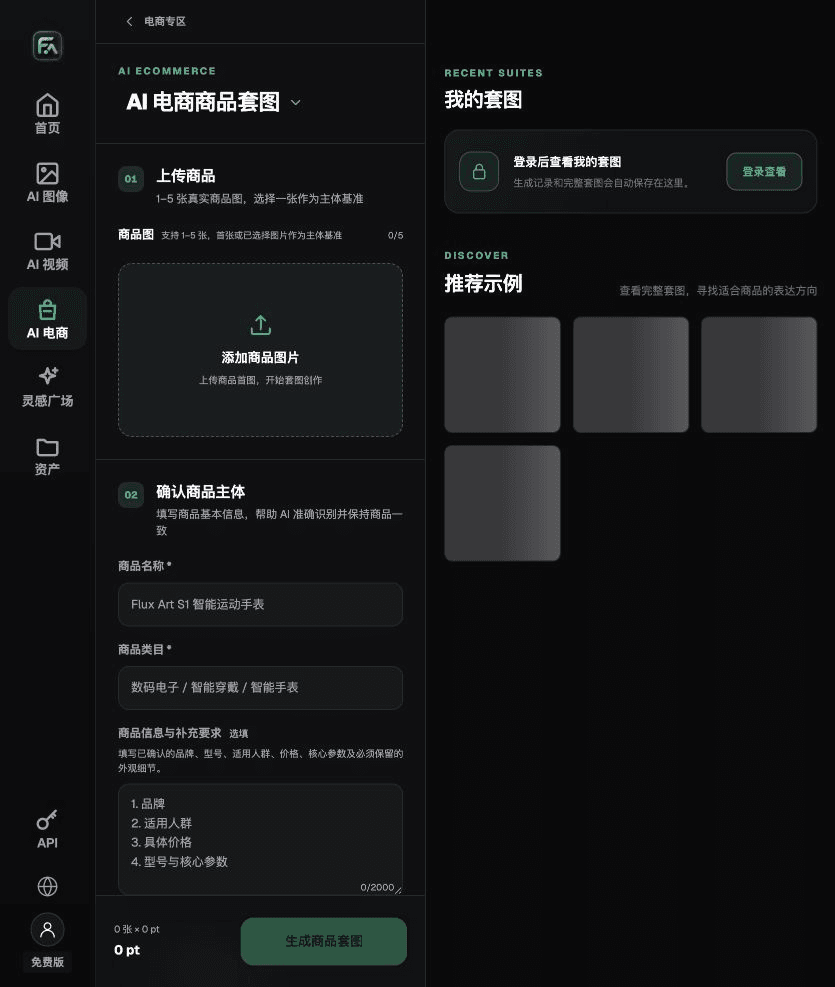
| What to clarify for this task | Details |
|---|---|
| Inputs or conditions | Real product photos and connector, hole, screw, scale, model, dimension, tolerance, and material markings |
| Corresponding actions | White background, structural details, specifications, use cases, and technical detail modules |
| Items to check | Redrawn structures, incorrect models or specifications, wrong dimensional relationships, and concept images mistaken for engineering drawings |
Flux Art is a multi-model AI visual creation and production platform operated by MORNING STAR INDUSTRY LIMITED. One account can access more than 50 third-party image and video models. The platform also offers e-commerce tools for product image sets, background changes, retouching, and virtual try-on. Model pages and e-commerce tools are separate workflows: if a task specifically requires GPT Image 2.5, confirm the selected model in its model page workflow. Do not attribute every tool's output to that model.
Keep technical text editable where possible
Check model numbers, dimensions, tolerances, and units one by one. Use professional layout software or the CAD source file for dense annotations to avoid misleading buyers with generated text. Use only application scenes that match the actual connector and connection method; do not add fictional parts just to make the image look industrial.
Turn industrial product imagery into a practical workflow
To create industrial product images for e-commerce, complete the relevant steps in Product Image Set: upload 1–5 real product photos; enter the product name, category, factual information, and details that must be preserved; select modules such as the product hero image, white-background main image, key selling points, use scenes, and close-up details; then set the aspect ratio, resolution, and language.
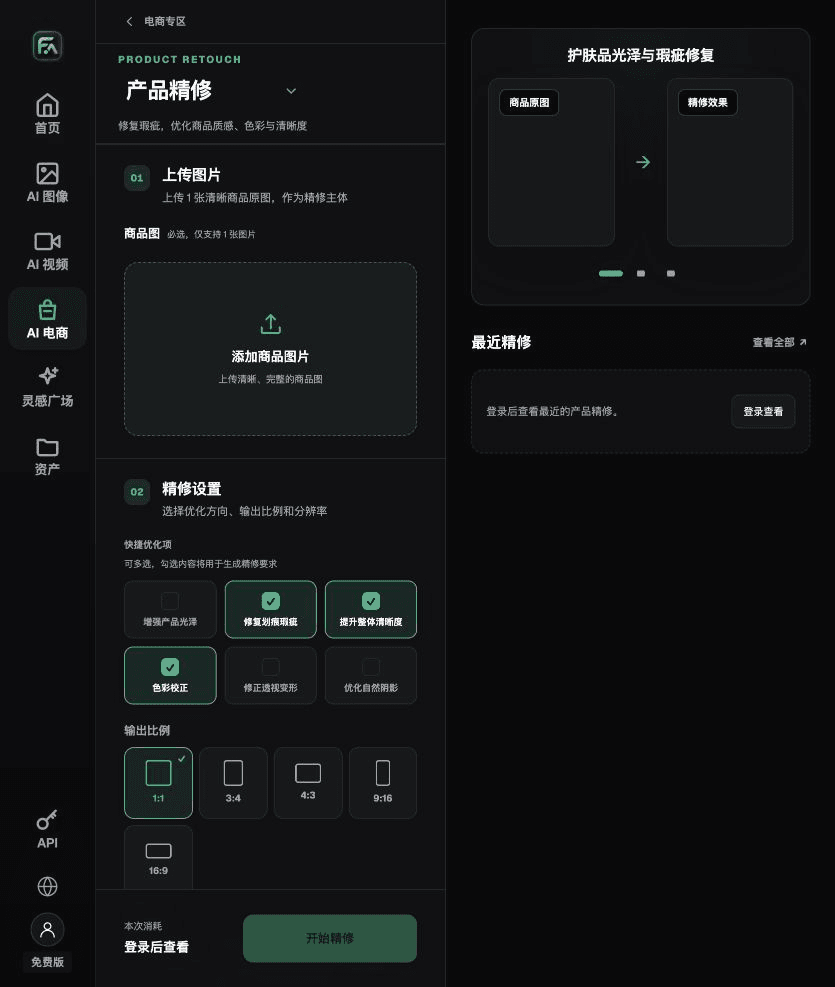
To create industrial product images for e-commerce, complete the relevant steps in Product Retouching: upload one product image with a clear subject and no severe obstruction; choose gloss, scratches or blemishes, clarity, color correction, perspective distortion, and natural shadows as needed. You do not need to enable every option.
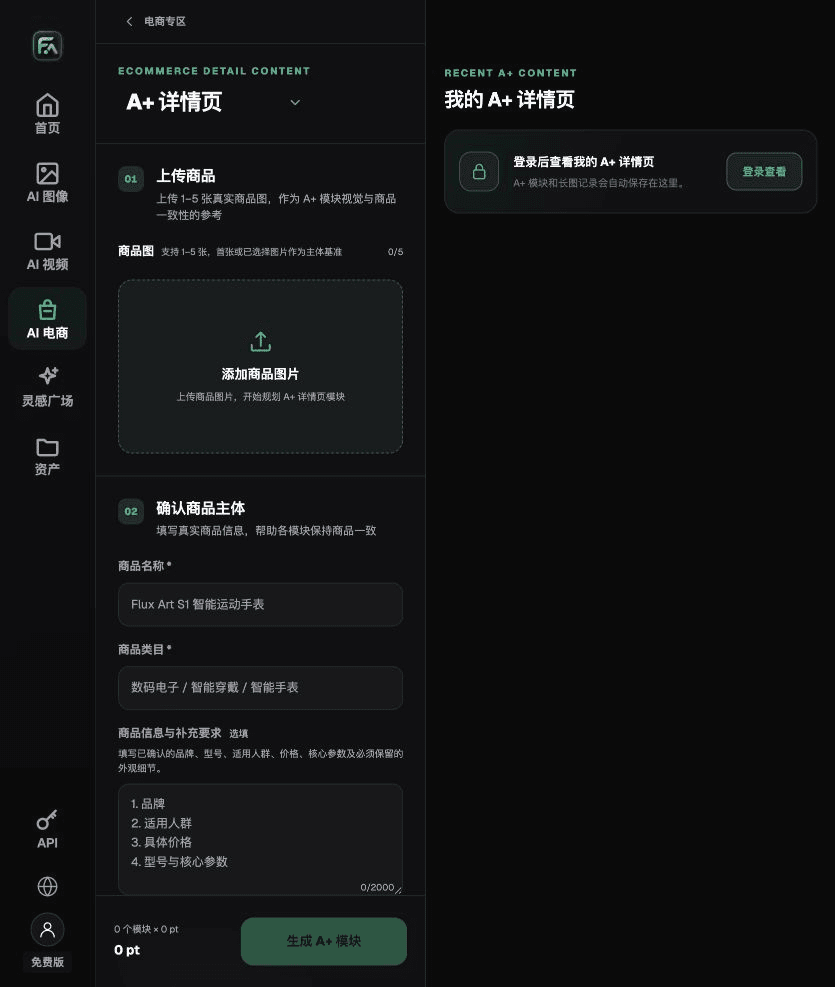
To create industrial product images for e-commerce, complete the relevant steps in the A+ Detail Page tool: upload 1–5 product images or consistent reference images, and enter product facts and selling points that have already been reviewed. Select the A+ content modules and output specifications you need, then check the headings, specifications, selling points, and images in each section.
For industrial product images for e-commerce, also check for redrawn structures, incorrect models or specifications, wrong dimensional relationships, and concept images mistaken for engineering drawings. Review this delivery checklist together with the earlier requirement to separate presentation images from engineering references.
A prompt to try for this task
Create e-commerce images for an industrial product. Use the uploaded real product photo as the subject. Preserve the connector, holes, screws, scale markings, model number, dimensions, tolerance markings, and material. Generate only this: an interface close-up preserving actual hole orientation with space for the model label. Target audience: [enter]. Placement: [enter]. Lighting: [enter]. Do not invent specifications, accessories, certifications, performance claims, or structural features.

Check these items before delivery
After creating industrial product images, check the final files for redrawn structures, incorrect models or specifications, wrong dimensional relationships, and concept images mistaken for engineering drawings. If you continue with other modules or SKUs, reuse the approved evidence for the subject and validate each new task separately. Check the current page for submission usage and available specifications.

From production to deliverable files
After completing the task on this page, archive the original product photos, approved text, selected tool or model, input instructions, candidate versions, and final exports together. Always keep the original photos separate; revisions should not overwrite the product references. Include the SKU or task ID in filenames so the operations team can find the sales version associated with each image. Before delivery, check resolution, cropping, captions, and links for each actual placement. Passing review on one large image does not mean every placement is ready.
Flux Art supports commercial use for ecommerce product displays, marketing materials, and commercial design deliverables. Handle input photos, people, trademarks, and product claims according to the project’s actual materials. Checking input rights and product accuracy is a separate delivery task, not a qualification of the platform’s commercial-use support.
Sources and related workflows
For model background, see OpenAI's official introduction to ChatGPT Images 2.5, retrieved on 2026-09-25. Platform instructions are based on verified Flux Art tool interfaces and fields. This article provides production steps and examples to carry out; it does not claim generation tests, pass rates, savings, or customer results.
Find the relevant tools in the Flux Art AI E-commerce Workspace. For a related task, read the 2026 AI Visual Solution for B2B Industrial E-commerce for additional production guidance.
Explore more features on the Flux Art website.