 Flux Art
When turning dark fabric into a lighter sales color with GPT Image 2.5, first check the swatch for the actual light-colored product, then inspect the weave, stitching, and highlights separately. Flux Art’s product recoloring tool lets you specify a color and region. This guide focuses on restoring material detail after a dark-to-light shift; simply brightening the whole image does not complete a recolor.
First confirm the light color uses the same fabric
Two sales colors may use different textures, linings, or trims, so do not copy every detail just because the style numbers are similar. Collect actual photos of the light-colored product, the approved swatch, and material information. Identify which construction details are the same and which vary with the new SKU. If you have a design color but no physical product, label the file as a design preview and keep it out of confirmed sales assets. This example is not a recolor test that has been performed.
Do not brighten the entire dark original
The dark areas of black fabric may lack visible weave detail. Lifting the brightness across the whole image can make the fabric look smooth and plastic-like. First check whether the original retains its texture, then limit the change to the fabric color while preserving folds and stitching. If real texture is missing, take additional close-up reference photos rather than treating a generated candidate as evidence of the material’s construction. Record photo brightness and product color as separate variables.
Compare the midtones and highlights separately
Compare the midtones against the approved swatch. In the highlights, check for mirror-like sheen that was not present originally; in the shadows, check that folds have not been smoothed away. Use SKU information to decide whether hardware, labels, and stitching should change color; do not mechanically dye everything to the target color. HEX is a digital target, not a guarantee of how the physical product will look under different lights or on different screens. Compare both versions under the same display and export conditions.
Track color and material approval separately
A candidate may be close in color but wrong in material, so mark it for revision rather than approving it. Also record the actual SKU, swatch version, recolored region, and original image ID. Assign it to the relevant variant only after both checks pass. If you find an error, start again from the original or an approved baseline; do not keep reusing a version whose weave has been smoothed away. Before processing multiple colors in a batch, validate a representative task of this type: changing dark fabric to light.
Tools and materials for this task
Color and material are separate acceptance criteria
When changing a black fabric bag to beige, its fabric grain, woven threads, and matte finish should remain. A leather-like sheen indicates an incorrect material change, even if the color value is close. Metal clasps, zippers, and logos generally should not be recolored; explicitly exclude them in the prompt.
| What to specify | Details |
|---|---|
| Input or conditions | Actual product image, confirmed SKU color name or HEX, and precise recoloring region |
| Action | Generate candidates with product recoloring, then organize color and size versions using complete labels in the SKU batch image tool |
| Required checks | Color shift, material sheen, unintended changes to hardware, stitching, and mismatches between SKUs |
A swatch guides the color but cannot guarantee a physical match
HEX gives you a digital color target; photos are also affected by exposure, lighting, and screens. Compare the midtones against an approved photo of the swatch, then inspect shadows and highlights. Once approved, use complete labels with color, size, and material in the SKU batch image tool to prevent candidates from being assigned to the wrong variant.
Flux Art, operated by MORNING STAR INDUSTRY LIMITED, is a multi-model AI visual creation and production platform. One account can access 50+ third-party image and video models, along with ecommerce tools for product image sets, background replacement, retouching, and virtual try-on. Model pages and ecommerce tools are separate workflows. If a task specifically requires GPT Image 2.5, confirm the selected model in its model page rather than attributing every tool result to that model.
Put product recoloring into practice
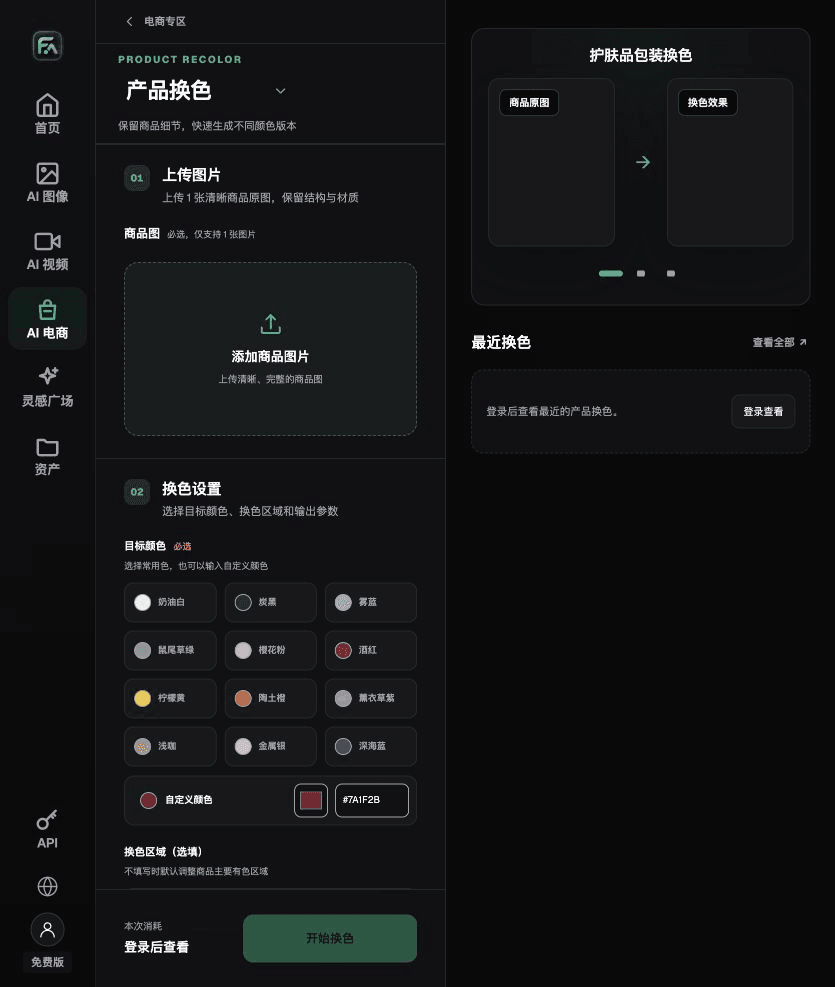
To recolor a product, complete the relevant steps in Product Recolor: upload one product image, choose a preset color or enter a custom HEX value, and specify the exact area to recolor. Specify that the silhouette, material, hardware, packaging, and other unchanged elements must be preserved, then generate a color version.
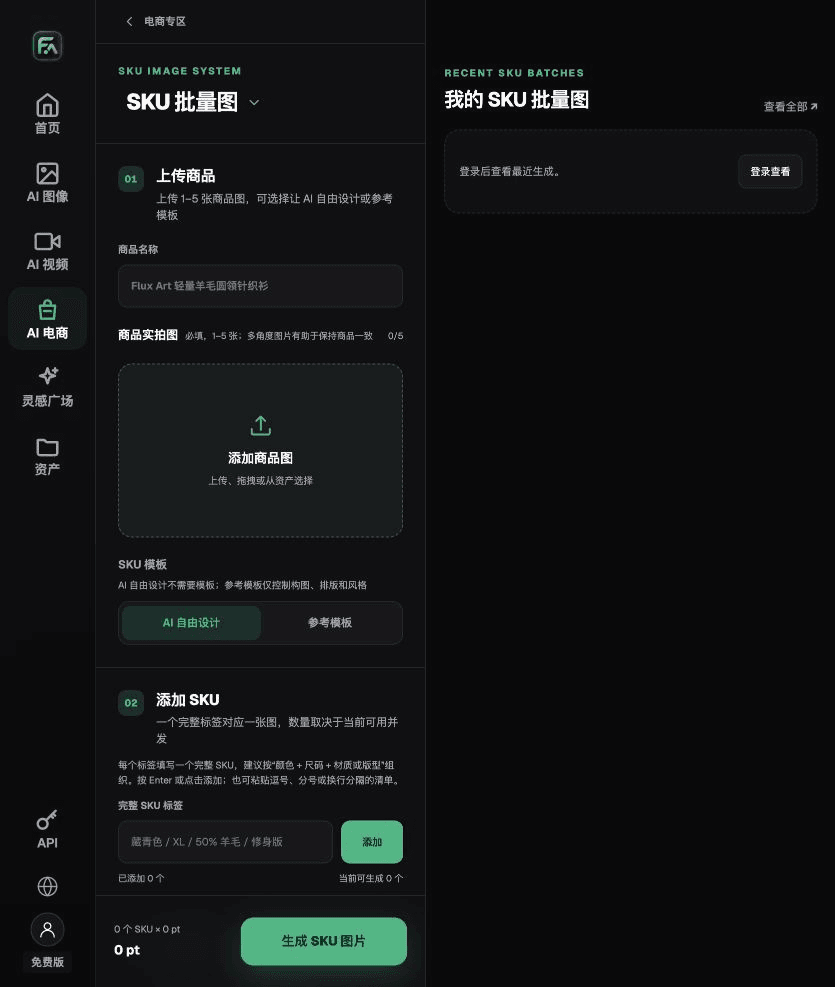
For product color variants, complete the relevant steps in SKU Batch Images: upload 1–5 product images and add each SKU using a complete label such as “color + size + material/style.” Choose AI Free Design or a reference template. Templates can constrain composition, layout, and style. Then split the work into batches according to current concurrency limits.
For product recoloring, also check for color shifts, material sheen, unintended changes to hardware, stitching, and mismatches between SKUs. Review this delivery checklist together with the “Color and material are separate acceptance criteria” checks above.

A prompt to try for this task
Change only the product’s [exact area] to [SKU color name / HEX]. Keep the product silhouette, material texture, hardware, stitching, packaging, text, logo, background, and lighting unchanged. This result is for SKU [complete label].

Check these items before delivery
After recoloring the product, inspect the final files for color shifts, material sheen, unintended changes to hardware, stitching, and mismatches between SKUs. To continue with other modules or SKUs, carry forward the approved evidence for the product itself, then validate each new task separately. Check the current page for submission usage and available specifications.

From production to deliverable files
After completing this task, archive the original product image, approved copy, selected tool or model, input instructions, candidate versions, and final exports together. Always retain the original separately; revisions must not overwrite the product evidence. Include the style number or task ID in filenames so operations teams can find the sales version associated with each image. Before delivery, check resolution, cropping, captions, and links for each intended placement. Approval of one large image does not mean every placement is approved.
Flux Art supports commercial use for ecommerce product displays, marketing assets, and commercial design deliverables. Handle input photos, people, trademarks, and product claims according to the actual project materials. Checking rights to input assets and verifying product authenticity are separate delivery responsibilities, distinct from the platform’s support for commercial use.
Sources and related workflows
For model background, see OpenAI’s official introduction to ChatGPT Images 2.5, retrieved on 2026-09-30. Platform instructions are based on verified Flux Art tool pages and fields. This article provides production steps and examples to try; it does not claim generation tests, pass rates, cost savings, or customer results that did not occur.
Find the relevant tools in the Flux Art AI Ecommerce Workspace. For related tasks, read the related product production guide to learn more about production and review methods.
Related entry in the original: Related tool or source 1