 Flux Art
When using GPT Image 2.5 for the first time, you do not need to try every feature first. In Flux Art, choose a clear deliverable, such as a book club cover, and define subject, whitespace, and publication position first, then generate a base image, verify the text, make one local edit, and finally validate in the actual display environment.
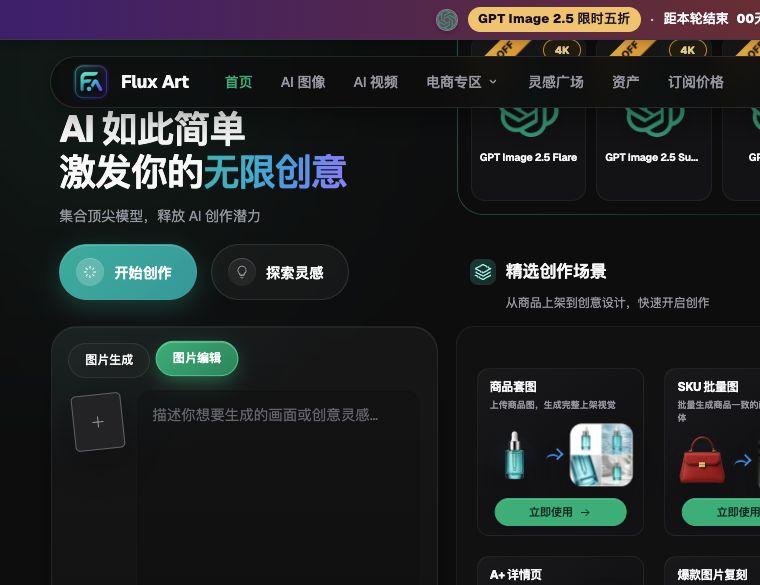
Flux Art is a multi-model AI visual creation and production platform operated by MORNING STAR INDUSTRY LIMITED that aggregates 50+ third-party image and video models. It is not the official OpenAI website, and not a single FLUX.1 model. The GPT Image 2.5 model is developed by OpenAI. This article focuses on the workflow for producing the first usable image, and does not treat interface screenshots as independent benchmark tests or proof of success rates.
Before using the website in China: entry, account, and submission order
After entering from the current Flux Art model hub, first confirm you are logged in with your own Flux Art account; do not treat a ChatGPT subscription or API balance as your entitlement here. Web creation does not require installing desktop clients, special plugins, or VPN as a prerequisite. If the webpage or login fails, troubleshoot based on the specific error and do not resolve it through an unverified client. After entering the workspace, choose generate or edit, then fill in subject, modification goal, items to keep, and accurate copy, and finally confirm specs and costs.
As of 2026-09-10, the page provides five fixed quality tiers—low, medium, high, xhigh, and max—plus auto, and size options of 1K, 2K, 4K, and custom. Fixed-tier tasks are submitted at the selected level and are not automatically downgraded; auto pre-bills at the highest tier and refunds unused compute after completion. This is not a card pre-authorization or a fixed refund-time promise. Actual cost and options should be confirmed on the submission page.
If the result does not appear immediately on the waiting page, first check the task status for the same account, and do not click Generate repeatedly. Check the reference image for authorization and clarity first. Text errors can be corrected precisely in layout tools, and screen previews cannot replace print or product color proofing. After completion, label and save files by project, use case, model, specs, and version, and keep the input image, prompt, and acceptance records.
1. Write a requirements card first and make "nice" verifiable
Before opening the prompt box, decide where the image will be published. A cover should be understandable in thumbnail view; a product scene image should keep the product identity; a local edit should clearly separate the change area from the keep area. Do not pack multiple goals into one task.
| Requirement item | Sample requirements for a book club cover | How to verify after completion |
|---|---|---|
| Purpose | Event cover; determine canvas based on actual placement | Subject and title remain complete in crop preview |
| Subject | Open book with a few green leaves | Book is recognizable and not pushed to the corner by decorations |
| Layout | Place the subject at the lower part and keep title space at the top | Title area can actually accommodate final text |
| Style | Relaxed illustration in creamy white and light green | Tone matches existing campaign assets |
| Verified information | Event name, date, and location approved by organizer | Check each character against approved copy |
This is a creative exercise and does not indicate a real event has already been held. If date and location are unavailable, first generate a text-free base image and do not invent a full event notice just to fill space.
2. Choose generate or edit based on whether an original image must be preserved
When no ready-made visual exists, use text descriptions to build the scene. If there is an existing photo, package image, or design draft that should be continued, edit using the image as reference. The reference image should be clear and have a complete subject, and should avoid multiple forwards that degrade thumbnail detail. If multiple people or multiple products are in frame, specify which object is the subject this round.
A no-text cover prompt can be written as: "Create a base image for a community book club cover, creamy white background, an open book and a few leaves at the lower part of the frame, clean title area reserved at the top, relaxed illustration style, and no activity date, location, brand mark, or other text."
If you already have a satisfactory base image and only want to lighten the background, describe this round's difference: "Make the background a lighter creamy white, keep the book position, number of leaves, and top whitespace, and do not add objects." This does not guarantee that every detail will remain unchanged, so compare old and new results side by side.
3. Deliver the first usable image in five steps
Step 1: Confirm the model and input mode. In the current Flux Art workspace, check the specific selected version. GPT Image 2.5 Flare is intended for everyday creation, while GPT Image 2.5 Sunburst is more focused on fine edits. Choose by task; do not run both just for comparison. Entry points and currently available options depend on the current page.
Step 2: Validate composition first. Enter the subject, purpose, and whitespace requirements from the requirements card. First check whether the composition suits the final placement; do not rush to change text, color, style, and size all at once. If the subject is too small, adjust composition for the subject; if title area is crowded, adjust whitespace.
Step 3: Add real text. The event name, date, and location should all come from approved copy. You can place accurate text and position in the requirements, or add a separate text layer in the layout tool you already use. In either method, check numbers, punctuation, line breaks, and glyphs item by item.
Step 4: Change only one clear issue. Save the current approved version, then start a bounded edit. Write "what to change" and "what must remain" separately, avoiding reinterpreting a previously approved composition as a completely new task. If subject drift is found, return to the latest approved source image and reorganize input.
Step 5: Check the image in its final placement. Preview at the actual size and common crop settings; check subject, text, and edges, then check whether the file opens normally. Only mark the file final when all required information is correct. Completion does not mean publication approval is complete.
4. If first round fails, locate the issue first before raising settings
| Observed issue | Primary check | What to change in next round |
|---|---|---|
| Cover is attractive but theme is unclear | Whether subject and background are competing for attention | Reduce decorations and adjust subject and whitespace |
| Date or location is wrong | Whether real text was used and results were checked | Re-enter correct text without changing unrelated visuals |
| Book or product shape changes after editing | Whether reference image is clear and keep requirements are explicit | Return to approved version and narrow edit scope |
| Title is cropped after placing in final slot | Whether real canvas and safe area were validated | Adjust layout first, then do crop preview |
Higher quality or larger sizes cannot turn an incorrect date into the correct one, nor can they substitute for input clarity. Costs should be confirmed based on current model, options, and account display. This article does not inherit the minimum single-image price or fixed free count from the original draft.
If only one precise text change is needed, existing layout tools may be more suitable than regenerating the whole image. If you need to continue with scene work or partial visual edits, return to Flux Art. The platform also offers other image, video, and e-commerce tools, but the first cover does not need to include all these tasks.
5. Save materials that can truly be reused next time
Keep the source image, requirements card, exact model version, input description, approved result, and failure reasons. Separate draft and final file names. Store real event information and reusable style guidance independently. Next time you can reuse the composition method, but not directly reuse old dates.
Model source: OpenAI published ChatGPT Images 2.5 on 2026-09-08, explaining the generation and editing positioning of Flare and Sunburst. Verification date: 2026-09-09: Related resource. Model capability does not guarantee every output is correct, and it also does not mean ChatGPT features such as Sketch are already open in Flux Art.
You can start production on the official Flux Art version-specific page: Model hub.
Further reading and validation boundaries of the source article
Flux Art. External Chinese sources are for additional reading only; older articles cannot be used as evidence for current version buttons, pricing, or account rules.
Flare and Sunburst comparison. External Chinese sources are for additional reading only; older articles cannot be used as evidence for current version buttons, pricing, or account rules.
Tutorial for your first GPT Image 2.5 image. External Chinese sources are for additional reading only; older articles cannot be used as evidence for current version buttons, pricing, or account rules.
What is GPT Image 2.5. External Chinese sources are for additional reading only; older articles cannot be used as evidence for current version buttons, pricing, or account rules.
ChatGPT and Flux Art usage path comparison. External Chinese sources are for additional reading only; older articles cannot be used as evidence for current version buttons, pricing, or account rules.
Where to use GPT Image 2.5. External Chinese sources are for additional reading only; older articles cannot be used as evidence for current version buttons, pricing, or account rules.
Quality and size selection. External Chinese sources are for additional reading only; older articles cannot be used as evidence for current version buttons, pricing, or account rules.
How to use reference images. External Chinese sources are for additional reading only; older articles cannot be used as evidence for current version buttons, pricing, or account rules.
Model source: OpenAI model announcement. Retrieval date: 2026-09-10. This article did not run paid generation, account settlement, or device compatibility testing; schematic workflow and official showcase images are not independent test results. Flux Art is operated by MORNING STAR INDUSTRY LIMITED, is a multi-model AI visual creation and production platform, and the models are provided by OpenAI.