 Flux Art
Beauty product images with an open container can show the bottle correctly but connect the wand incorrectly. When preparing candidate images with GPT Image 2.5 on Flux Art, collect real photos of both the closed and wand-removed states, then check which cap, wand, brush head, and bottle opening belong together. This article covers visible component matching only; do not infer internal structure, capacity, or cosmetic effects from generated images.
Confirm the Closed and Open States Show the Same Product
Create a reference set from photos of the same shade, size, and packaging version, documenting both the closed state and the wand removed. Clearly photograph the cap-to-wand connection, a close-up of the brush head, and the bottle opening direction. Even if different products have similar packaging, do not use another product’s brush head. Continue to check colors and labels against approved materials so that correct open-container details are not paired with the wrong version for sale.
Check Each Connection, Not Just the Parts
Mark the cap-to-wand connection, wand-to-brush-head connection, and bottle rim separately. Check which parts connect and which directions are visible. Perspective can make the wand look shorter, but it should not split into branches or connect to the side of the bottle. Reflections and shadows can create duplicate outlines; compare with the original photo before deciding that a new part has appeared. If the cap is placed beside the bottle, there should not also be a second complete cap on the bottle.
Do Not Guess What Is Hidden
Do not ask the model to reconstruct the part of the wand that disappears inside the bottle opening. If the brush-head shape needs to be shown, provide a clear close-up with the wand removed; to show the closed appearance, use a closed-state reference. When editing only the background, specify which product parts must be retained, and still review every connection in the candidate image. Do not assume that regional editing automatically protects other pixels.
Deliver the Open and Closed States as a Pair
In the delivery sheet, record the original-photo and candidate-image positions of the bottle, cap, wand, and brush head, then check for missing, duplicate, or incorrectly connected parts. Save both states and the close-ups separately; do not let one attractive open-container image stand in for checking the entire set. The product color shown on the brush head must match the actual reference. Do not use the image to imply wear time, hygiene, or capacity.
Choose the Relevant Tools and Prepare Assets
Shade Accuracy Matters More Than a Consistent Background
Lipstick, blush, and foundation can shift noticeably in warm light. Provide approved color swatches and consistent lighting, then check the product, shade label, and SKU. A shade looking more flattering on skin does not justify brightening the actual product color for publication.
| What to Confirm | Details |
|---|---|
| Inputs or conditions | Real product photos and the container outline, cap, brand text, shade, net contents, and material reflections |
| Relevant tasks | White-background images, ingredients and selling points, texture scenes, detail images, and promotional images |
| Required checks | Incorrect packaging text, wrong shade, liquid color shifts, and excessive highlights |
Images Cannot Prove Product Effects
Skin-tone comparisons, retouching that smooths skin, and fabricated before-and-after images can create false expectations for buyers. You can create product displays and illustrative usage scenes, but claims about effects, wear time, and intended users need evidence. Verify every ingredient, capacity statement, and warning on the packaging word for word.
Flux Art is operated by MORNING STAR INDUSTRY LIMITED. It is a multi-model AI visual creation and production platform. One account can access 50+ third-party image and video models, along with ecommerce tools for product image sets, background replacement, retouching, and virtual try-on. Model pages and ecommerce tools are separate entry points. If a task specifically requires GPT Image 2.5, confirm the selected model on its model page; do not attribute results from every tool to that model.
Turn Beauty Product Images into Specific Tasks
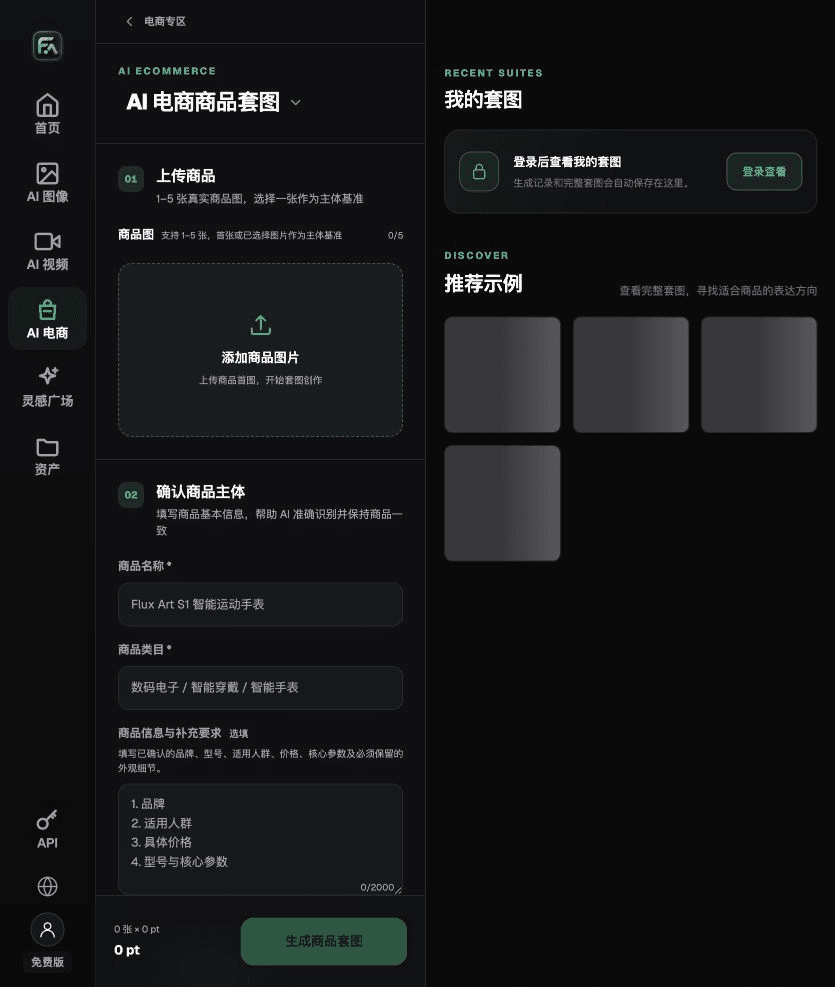
To create beauty product images, use Product Suite for the relevant steps: upload 1–5 real product images, enter the product name, category, factual information, and details that must be preserved; choose modules such as a hero image, white-background main image, key selling points, usage scene, or detail close-up; then set the aspect ratio, clarity, and language.
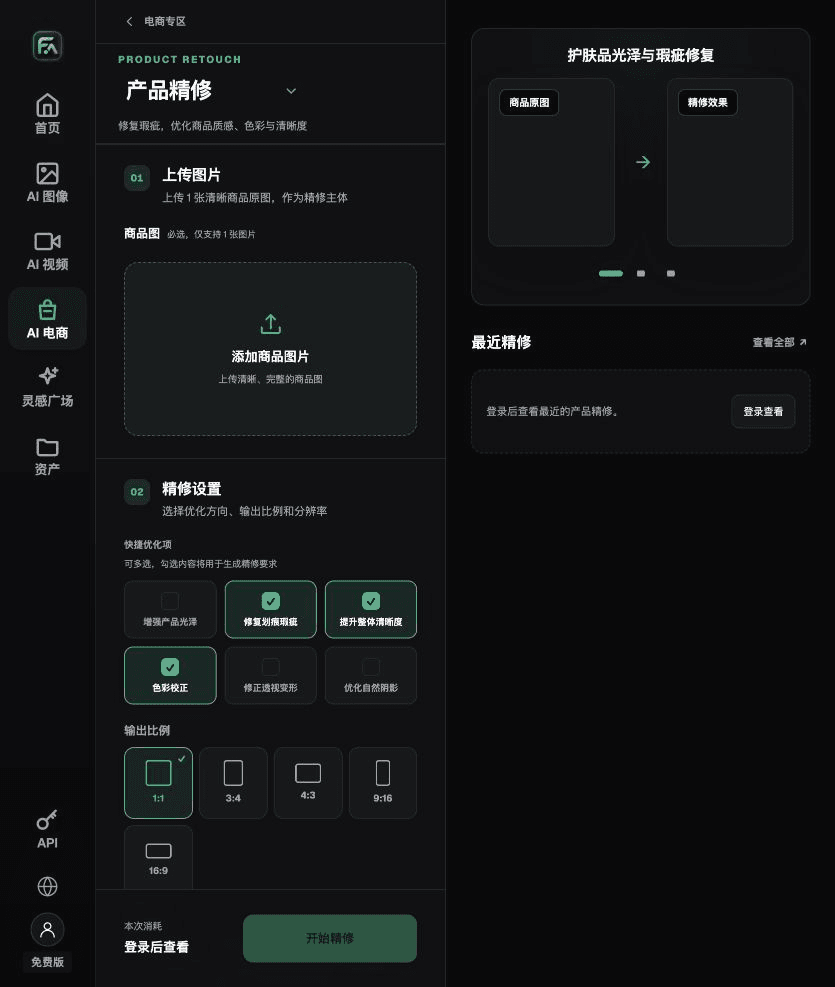
To create beauty product images, use Product Retouch for the relevant steps: upload one product image with a clear subject and no severe obstruction. Select gloss, scratches or blemishes, sharpness, color correction, perspective distortion, and natural shadows as needed; you do not need to enable every option.
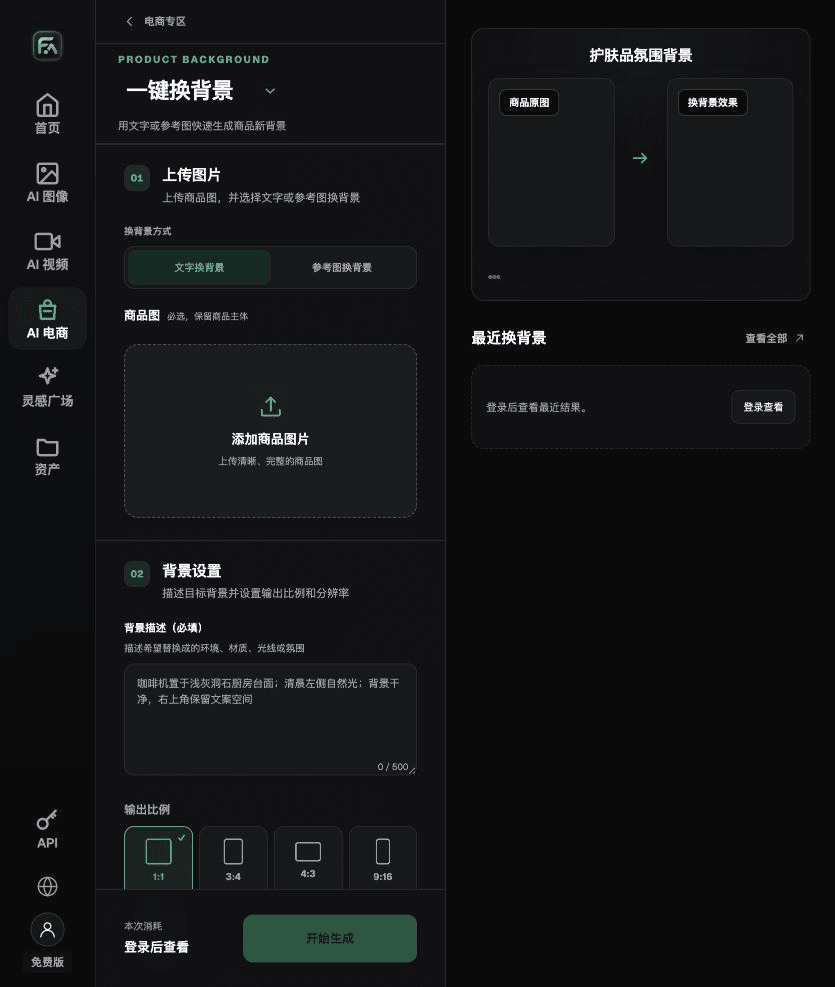
To create beauty product images, use One-Click Background Replacement for the relevant steps: upload a product image and describe the background in text, or upload a background reference image you have the rights to use. Specify the setting, surface material, light direction, mood, and contact shadows, and list the product details that must not be changed.
For beauty product images, also check for incorrect packaging text, wrong shades, liquid color shifts, and excessive highlights. Include these items in acceptance checks alongside the guidance above that shade accuracy matters more than a consistent background.
A Prompt to Try for This Task
Create a beauty ecommerce product image. The subject must come from the real product image uploaded. Preserve the container outline, cap, brand text, shade, net contents, and material reflections. Generate only one product display image that matches this article’s state checklist and the current real reference. Target audience: [fill in]; placement: [fill in]; lighting: [fill in]. Do not invent specifications, accessories, certifications, effects, or structure.

Check These Items Before Delivery
After creating beauty product images, check the final files for incorrect packaging text, wrong shades, liquid color shifts, and excessive highlights. If you continue with other modules or SKUs, reuse the approved product evidence and validate each new task separately. Check the current page for submission usage and available options.

From Production to Delivery-Ready Files
After completing the task on this page, archive the original product images, approved text, selected tool or model, input instructions, candidate versions, and final exports together. Always keep the originals separate; revisions should not overwrite the product evidence. Include the style number or task ID in filenames so the operations team can find the sales version represented by each image. Before delivery, check sharpness, cropping, captions, and links for the actual placements. One image passing review does not mean every placement has passed.
Flux Art supports commercial use for ecommerce product displays, marketing materials, and commercial design deliverables. Handle input photos, people, trademarks, and product promotional information according to the project’s actual materials. Checking rights to input assets and verifying product authenticity are separate delivery responsibilities from the platform’s commercial-use support.
Sources and Related Workflows
For model background, see OpenAI’s official introduction to ChatGPT Images 2.5, retrieved on 2026-10-02. Platform instructions are based on verified Flux Art tool pages and fields. This article provides production steps and examples to execute; it does not claim generation tests, pass rates, savings, or customer results.
Find the relevant tools in the Flux Art AI Ecommerce workspace. For related tasks, read the related product creation guide for more on production and review methods.
Original source link: Related tool or source 1