 Flux Art
For before-and-after images of storage products on Xiaohongshu, first make the two images comparable: use the same camera angle, the same set of items, and clearly defined before and after states. Flux Art’s GPT Image 2.5 can help with layout and surrounding backgrounds; use actual photos to show the real storage result, rather than presenting a generated tidy scene as an outcome that really happened.
Fix the tabletop area and set of items before shooting
As a practical example to carry out, use a desktop organizer and first list the actual items to put away, such as pens, scissors, tape, and sticky notes. Photograph the list so each item can be identified. Fix the camera position, shooting direction, and tabletop boundaries, then photograph the before state and the actual arranged state. Do not secretly remove a large item from the second photo or crop the first to look more crowded and manufacture a difference. If the photos have already been taken from different angles, first check whether a shared crop can create a comparison without changing object proportions. If they cannot be aligned, reshoot; do not let a model guess missing areas and present them as fact.
Separate comparison content from editable decoration
Treat the organizer, item count, spatial relationships, and actual use results in the two real photos as protected facts. Background clutter, outer margins, and title decoration can be edited. In GPT Image 2.5, you can request that the facts about the subjects in both photos be preserved while tidying the surrounding space for layout, then check the output item by item. Removing an obstruction may also change items inside the organizer, so do not judge only by whether the image looks tidier overall. If you want to show a proposed future arrangement, label it separately as a concept illustration and show it apart from the actual before-and-after photos, rather than combining them into a comparison that looks like a real test.
Align shared references; do not stretch images to force matching sizes
Choose a shared reference such as a table corner, a straight background edge, or a fixed position. Confirm that the views are similar before setting the same canvas and crop scale. If the organizer looks noticeably larger in one image, check the camera position and zoom; do not simply squeeze one image horizontally. In a side-by-side layout, place the same tabletop area in corresponding positions; check the scale in a vertical layout too. Add clear state labels to both images so they are not lost when the cover is cropped. The comparison describes only this photographed set of items and these states; do not extend it to unverified capacity figures or effect percentages.
Reconcile each item at delivery, then check the pair at mobile size
Use the original list to locate each item in the before-and-after images: still visible, placed inside the organizer with photo evidence, or not shown. If the count is uncertain, check the original photos first; do not add or remove items to create a more appealing comparison. Save the original photos, editing notes, and paired exports. View them at a typical note-reading size to check labels, edges, and product details. If the images are on separate cards, readers should still be able to recognize them as the same task; do not insert another product between them and cause confusion. This article provides a production method; no storage capacity or usage-effect tests were conducted.
Prepare the relevant tools and assets
A lived-in look does not mean inventing an experience
A cup on a desk can be a scene illustration; a claim that it “still does not leak after three months of use” needs real evidence. Keep this distinction in both images and copy. A few appropriate props can establish a real-life setting, while too many decorations can obscure product details.
| What to clarify for this task | Specifics |
|---|---|
| Inputs or requirements | Product images, note cover aspect ratio, real-use context, and approved copy |
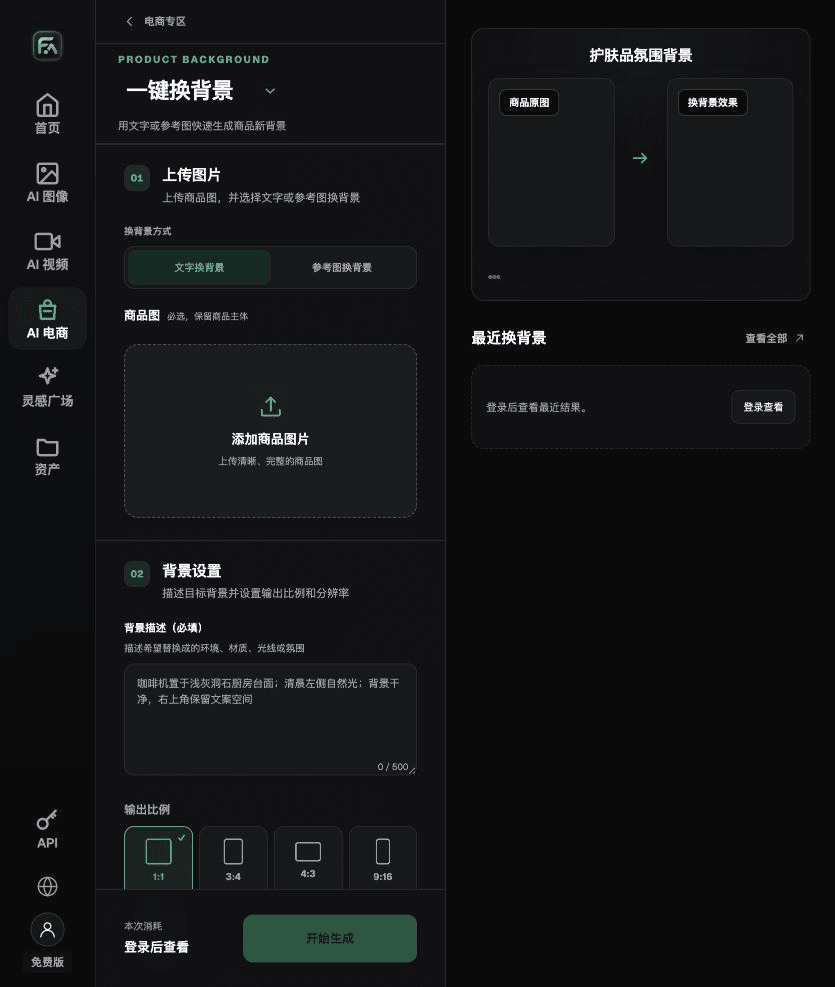
| Action | Use one-click background replacement to create a lifestyle scene, then use the product image set for the hero image, details, and selling points. Do not present a scene image as a record of an actual photo shoot. |
| Items to check | Authenticity of promotional claims, copy, plausibility of the scene, product color, logo, and platform identifiers |
The cover and detail images have different jobs
Keep one clear theme on the cover; use detail images to explain materials and functions. Set the aspect ratio for the final placement before generation to avoid having publishing software crop the title. Check every character in versions that contain brand text or campaign information.
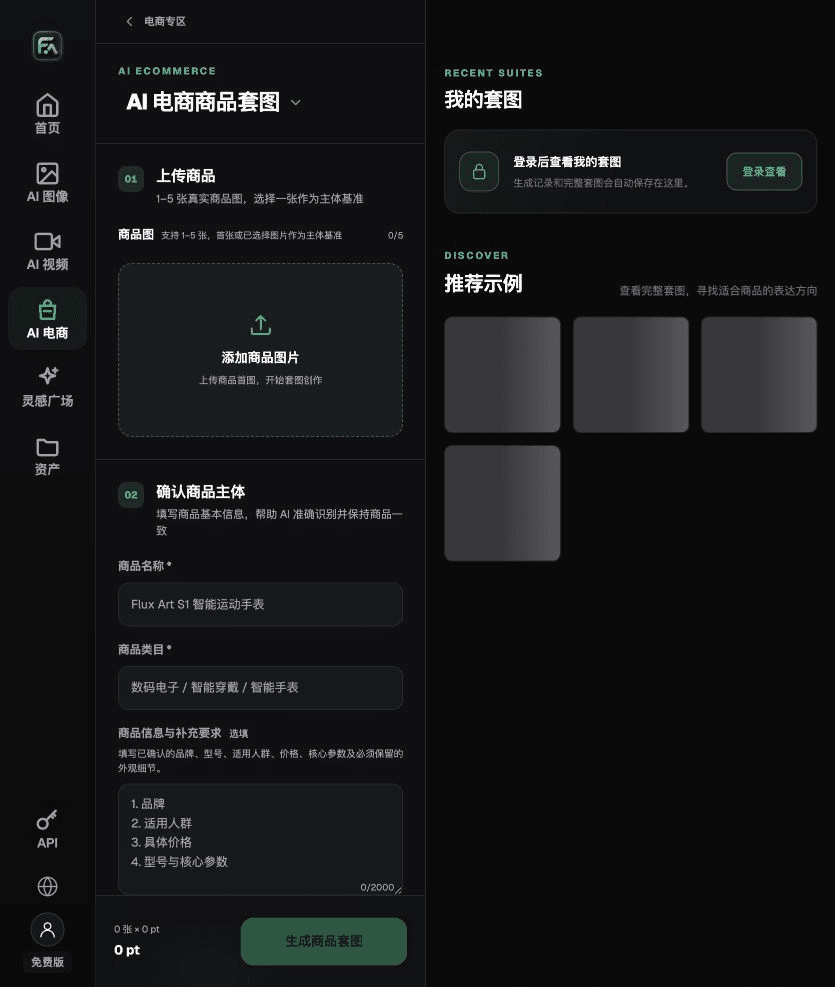
Flux Art is operated by MORNING STAR INDUSTRY LIMITED. It is a multi-model AI visual creation and production platform where one account can access 50+ third-party image and video models, along with e-commerce tools for product image sets, background replacement, retouching, and virtual apparel try-on. Model pages and e-commerce tools are separate entry points. If a task specifically requires GPT Image 2.5, confirm the selected model in its model-specific entry point; do not attribute results from every tool to that model.
Turn Xiaohongshu product images into actionable steps
For Xiaohongshu product images, use One-Click Background Replacement for the relevant step: upload a product image, describe the background in text, or upload a background reference image you have permission to use. Specify the setting, tabletop material, direction of light, mood, and contact shadows, and list the product details that must not change.
For Xiaohongshu product images, use Product Image Set for the relevant step: upload 1–5 real product images and enter the product name, category, factual information, and details that must be retained. Choose modules such as product hero image, white-background main image, key selling points, use scenarios, or detail close-ups, then set the aspect ratio, resolution, and language.
For Xiaohongshu product images, also check the authenticity of promotional claims, copy, plausibility of the scene, product color, logo, and platform identifiers. Review this delivery checklist together with the guidance above that a lived-in look does not mean inventing an experience.

A prompt to try for this task
Change only the background of the uploaded product to [specify setting], with a [specify material] tabletop and light coming from [specify direction]. Keep the product outline, angle, text, logo, color, material, and proportions unchanged. Add natural contact shadows. Do not add products or accessories.

Check these items again before delivery
After completing Xiaohongshu product images, check the final files for authentic promotional claims, copy, plausibility of the scene, product color, logo, and platform identifiers. If you continue with other modules or SKUs, carry forward the approved evidence about the product itself and verify each new task separately. Submission usage and available specifications are shown on the current page.

From production to delivery-ready files
After completing the task on this page, archive the original product photos, approved copy, selected tool or model, input instructions, candidate versions, and final exports together. Always keep the originals separate; do not overwrite the product evidence when making revisions. Include the SKU or task ID in filenames so the operations team can find the sales version associated with each image. Before delivery, check resolution, cropping, captions, and links for the actual placement. Passing review as one large image does not mean every placement has passed.
Flux Art supports commercial use and can be used for e-commerce product displays, marketing materials, and commercial design deliverables. Handle input photos, people, trademarks, and product promotional information according to the actual project materials. Verifying rights to input assets and product authenticity are delivery checks separate from the platform’s commercial-use support.
Sources and related workflows
Model background information is from OpenAI’s official introduction to ChatGPT Images 2.5, checked on 2026-09-30. Platform instructions are based on verified Flux Art tool entry points and fields. This article provides production steps and an example to carry out; it does not invent generation test results, pass rates, savings, or customer outcomes.
You can find the relevant tools in the Flux Art AI E-commerce Workspace. For related tasks, read the related product creation tutorial for more information on production and review methods.
Related link in the original draft: related tool or source 1